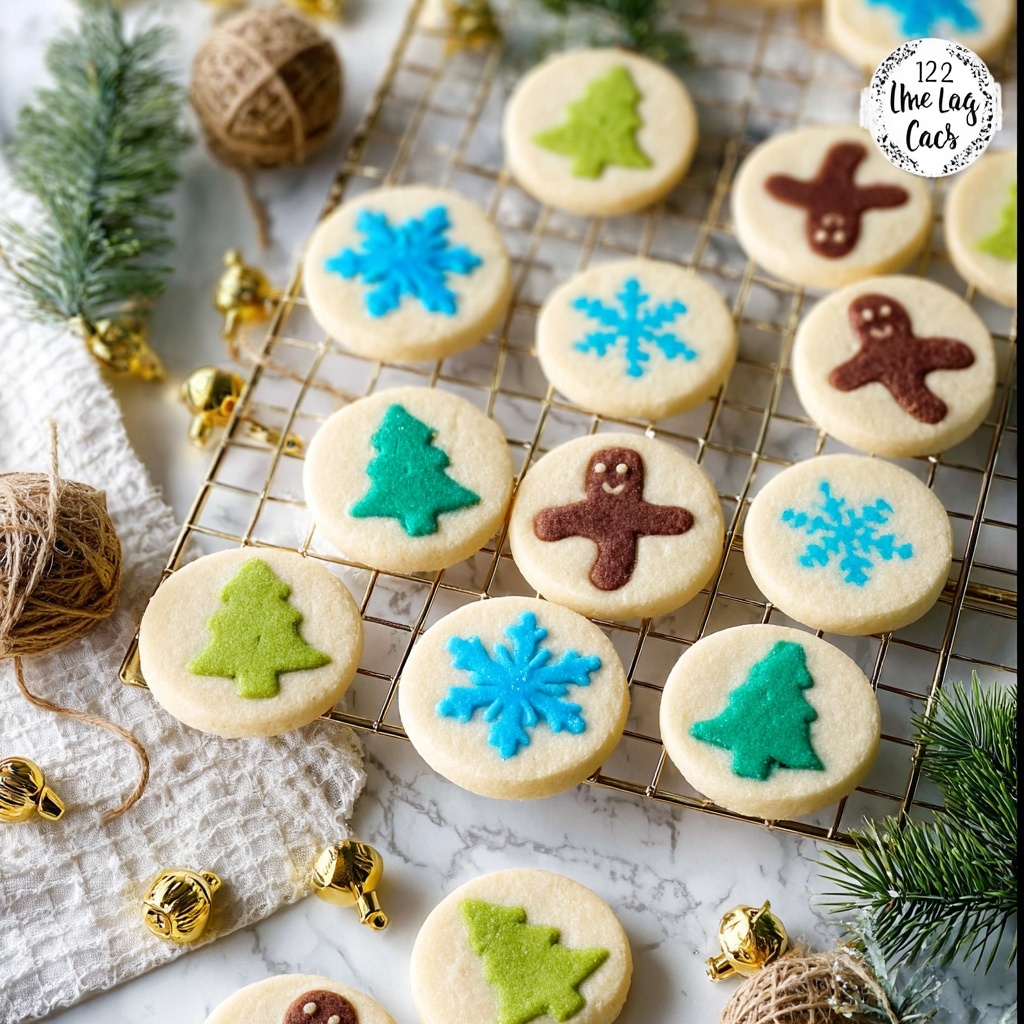
If you’re dreaming of a festive treat that’s as fun to make as it is to eat, this Slice and Bake Christmas Cookies Recipe is about to become your holiday go-to. Picture colorful, cheerful cookie stacks encased in buttery dough logs that you slice right before baking, revealing adorable shapes and vibrant layers every time. These cookies are not only a feast for the eyes but also delightfully soft with just the right amount of crisp on the edges—a truly magical addition to your holiday baking traditions.
Ingredients You’ll Need
These ingredients keep the recipe straightforward yet deliver rich flavor, tender texture, and vibrant color to your cookies. Each component plays a key role in creating the perfect balance of sweetness, structure, and festive cheer.
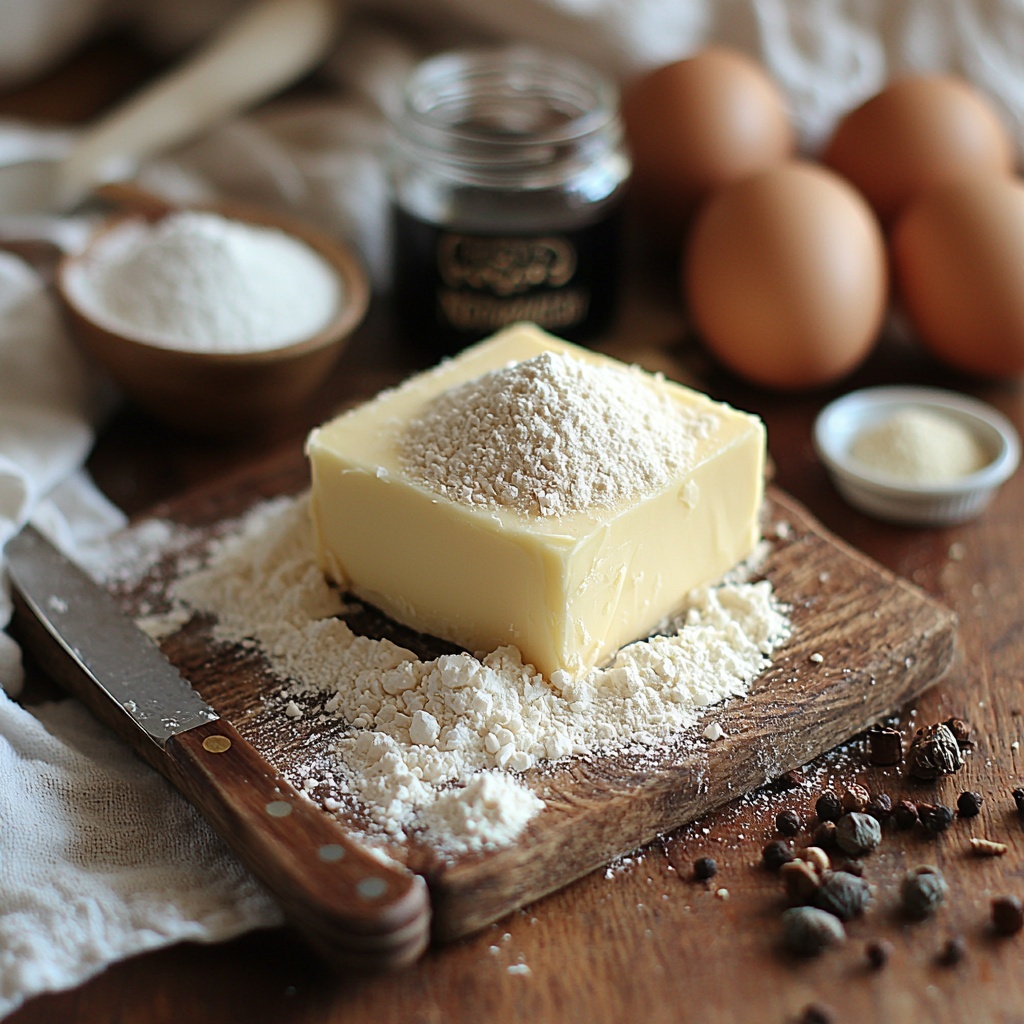
- Unsalted butter, 1 cup (227 grams): Softened butter gives the cookies rich flavor and tenderness.
- Confectioners’ sugar, ¾ cup (90 grams): Adds a smooth sweetness and helps achieve that delicate crumb.
- White sugar, ¾ cup (150 grams): Provides sweetness and promotes crisp edges.
- Vanilla extract, 1 ½ teaspoons: Enhances all the other flavors with a warm, comforting aroma.
- Eggs, 2: Bind the dough together and create structure for perfect slicing.
- All-purpose flour, 4 cups (480 grams): The backbone of your cookies, balancing soft and sturdy texture.
- Baking powder, ¾ teaspoon: Adds a gentle lift without making the cookies cakey.
- Salt, ¼ teaspoon: Elevates sweetness and rounds out the flavor.
- Gel food coloring: Creates the fun, festive colors that make these cookies truly stand out.
How to Make Slice and Bake Christmas Cookies Recipe
Step 1: Mix the Dry Ingredients
Begin by whisking together the flour, baking powder, and salt in a large bowl until everything blends nicely. This ensures your leavening agent will be evenly distributed, giving your cookies uniform texture and avoiding any salty surprises.
Step 2: Cream Butter and Sugars
In a separate bowl, beat softened butter with both sugars until light and fluffy—about three minutes. This step is crucial for a tender crumb and gives your dough a lovely airy quality that melts in your mouth.
Step 3: Add Vanilla and Eggs
To the creamed mixture, add vanilla and eggs, then beat until smooth. The eggs bring moisture and structure, while the vanilla adds warmth and depth.
Step 4: Combine Dry and Wet Ingredients
Now, gradually add the flour mixture to your buttery batter. Beat lightly just until a soft dough forms that isn’t sticky. This balance is key—you want your dough firm enough to hold its shape but soft enough to slice easily.
Step 5: Divide and Chill the Dough
Wrap two-thirds of the plain dough and refrigerate it. For the remaining third, divide it according to how many colors you want. I chose green, brown, and blue for a festive palette. This step sets the foundation for gorgeous, colorful layers.
Step 6: Color the Dough
Add gel food coloring to each small dough portion and mix thoroughly—either with a hand mixer or by kneading with gloved hands to avoid staining. Wrap and chill these vibrant bits for at least one hour to let the colors intensify and the dough firm up.
Step 7: Shape and Freeze the Stacks
Roll each colored dough to about half an inch thick, then cut out tiny shapes using mini cookie cutters. Stack identical shapes into tall, firm piles and freeze for at least four hours. This freeze helps keep the shapes sharp and intact when wrapping with plain dough later.
Step 8: Soften Plain Dough
After about three hours in the fridge, take out the plain dough and let it soften at room temperature for an hour. It needs to be pliable to wrap around each frozen stack easily without cracking.
Step 9: Wrap Shape Stacks in Plain Dough
Press the softened plain dough around each frozen stack, making sure the colorful shapes stay centered. For intricate shapes like snowflakes, gently push plain dough into crevices to seal everything nicely. This creates your cookie logs poised for slicing.
Step 10: Roll and Freeze the Logs
Roll the dough logs gently between your hands to smooth and round them out evenly. Wrap tightly in plastic wrap, then freeze for at least four hours or overnight, ensuring they firm up perfectly for slicing.
Step 11: Prepare to Bake
Preheat your oven to 350°F and line baking sheets with parchment paper, setting the stage for perfectly baked cookies.
Step 12: Slice the Cookies
Remove the frozen logs from the freezer and let them soften slightly for about 20 minutes—this helps avoid crumbling. Using a sharp knife, slice into quarters of an inch slices, revealing those festive layers and shapes.
Step 13: Bake to Perfection
Arrange slices on your baking sheets and bake for 9 to 10 minutes until cookies are just set and lightly golden at the edges. Let them cool and enjoy the magical transformation from dough logs to delightful treats!
How to Serve Slice and Bake Christmas Cookies Recipe
Garnishes
Though these cookies are stunning on their own, you can take presentation up a notch by dusting a little powdered sugar for a snowy effect or drizzling some white chocolate for extra festiveness. Sprinkles or edible glitter add fun sparkle, especially for kids and special occasions.
Side Dishes
These cookies pair beautifully with a classic cup of hot cocoa, spiced apple cider, or even a minty tea. Their buttery sweetness perfectly balances warm, cozy beverages to create that idyllic holiday moment you’ll want to savor again and again.
Creative Ways to Present
Slice and bake cookies make fantastic gifts. Bundle a few logs wrapped with festive ribbon and a handwritten tag for friends or colleagues, letting them bake fresh cookies at their leisure. For parties, arrange colorful stacks on a platter with greenery or holiday ornaments to make your dessert table truly eye-catching.
Make Ahead and Storage
Storing Leftovers
Once baked, store leftover cookies in an airtight container at room temperature. They stay fresh for about a week, perfect if you want to enjoy them gradually without losing that lovely softness and flavor.
Freezing
If you want to prepare in advance, the unbaked logs freeze wonderfully. Just wrap them well and store in the freezer up to three months. Slice and bake whenever holiday cookie cravings strike—you’ll save loads of prep time!
Reheating
To refresh cookies that have softened, pop them in a warm oven at 300°F for 5 to 7 minutes. This will revive their crisp edges and renew that just-baked aroma that fills your kitchen with holiday joy.
FAQs
Can I use regular food coloring instead of gel?
Gel food coloring is best for this recipe because it provides vibrant colors without changing the dough’s consistency. Regular liquid food coloring can make the dough too wet, affecting texture and baking results.
What if my dough is too sticky?
If your dough feels sticky and hard to handle, dust your work surface and hands with a bit of flour. You can also chill the dough longer to firm it up—it makes slicing much easier and cleaner.
Can I make these cookies without the colored dough?
Absolutely! The plain dough itself is delicious and buttery. The colored dough layers just add a fun, festive twist, but traditional slice and bake cookies work great with just the plain dough, too.
How do I store the sliced cookie logs before baking?
Keep the wrapped logs tightly sealed in the freezer until ready to slice. Avoid thawing before slicing except for the brief soften time of about 20 minutes—that keeps your shapes neat and easy to cut.
Can I use different shapes or sizes for the colored dough?
Yes! Mini cookie cutters of various shapes allow you to customize the look of your cookies. Just keep the thickness consistent to bake evenly and give your stacks a firm structure before wrapping.
Final Thoughts
This Slice and Bake Christmas Cookies Recipe truly captures the spirit of holiday baking—fun, colorful, and irresistibly delicious. Whether you’re baking with family, gifting to friends, or creating a festive spread, these cookies bring joy to every bite and every smile. I hope you enjoy making and sharing them as much as I do—happy baking!
Print
Delicious Recipe
- Prep Time: 1 hour 30 minutes (including chilling and shaping)
- Cook Time: 10 minutes per batch
- Total Time: 9 hours 35 minutes (including freezing and baking time)
- Yield: 20 servings (approximately 20 cookies, depending on slice thickness and shapes)
- Category: Baking
- Method: Baking
- Cuisine: American
Description
These Slice and Bake Christmas Cookies are festive, colorful, and perfect for holiday celebrations. Softened butter, combined with sugars and vanilla, creates a tender dough that’s lightly sweetened and easy to shape. The dough is divided into plain and colored portions, frozen in decorative stacks, and then wrapped to create beautiful, multi-colored cookie logs. Sliced thin and baked until just golden, these cookies are ideal for making ahead and serving fresh during the holidays.
Ingredients
Basic Dough:
- 1 cup (227 grams) unsalted butter, softened
- 3/4 cup (90 grams) confectioners’ sugar
- 3/4 cup (150 grams) white sugar
- 1 1/2 teaspoons vanilla extract
- 2 eggs
- 4 cups (480 grams) all-purpose flour
- 3/4 teaspoon baking powder
- 1/4 teaspoon salt
Coloring:
- Gel food coloring (various colors as desired, e.g., green, brown, blue)
Instructions
- Combine Dry Ingredients: In a large mixing bowl, whisk together the flour, baking powder, and salt until well combined. Set aside.
- Cream Butter and Sugars: In another large mixing bowl, beat the softened butter, confectioners’ sugar, and white sugar with a hand mixer until light and fluffy, about 3 minutes.
- Add Vanilla and Eggs: Add the vanilla extract and eggs to the butter-sugar mixture, then beat again until fully combined and smooth.
- Form Dough: Gradually add the dry ingredient mixture to the wet ingredients and beat until a soft dough forms. The dough should be soft but not sticky.
- Chill Plain Dough: Wrap and refrigerate two-thirds of the plain dough for later use.
- Divide and Color Dough: Divide the remaining one-third of dough into portions according to the number of desired colors. Add gel food coloring to each portion and mix well using a hand mixer or knead by hand with gloves. Wrap each colored dough portion tightly with plastic cling wrap and refrigerate for at least 1 hour.
- Shape and Freeze Colored Dough: Remove the colored dough from the refrigerator and roll each color out to about 1/2 inch thickness. Use mini cookie cutters to cut out small shapes, then stack identical shapes into tall, firm stacks. Repeat with remaining colored doughs and freeze the stacks for at least 4 hours to harden.
- Soften Plain Dough: After about 3 hours of freezing the colored dough stacks, remove the plain dough from the fridge and let it sit at room temperature for about 1 hour until softened.
- Form Cookie Logs: Remove the frozen shape stacks from the freezer. Press the softened plain dough around each stack to form a log, ensuring the stacked shapes run directly through the center. For shapes with intricate details, press small bits of plain dough into crevices before fully wrapping.
- Smooth and Freeze Logs: Gently roll the logs between your hands to smooth and create an even, round log shape. Wrap tightly in plastic cling wrap and freeze for at least 4 hours or overnight.
- Prepare Oven and Baking Sheets: Preheat oven to 350°F (175°C). Line two baking sheets with parchment paper.
- Slice Cookies: Remove the frozen logs from the freezer and let them rest for about 20 minutes to soften slightly. Using a sharp knife, slice the logs into 1/4-inch thick cookies.
- Bake Cookies: Place the sliced cookies onto the prepared baking sheets, spacing them slightly apart. Bake for 9 to 10 minutes, or until the cookies are set and lightly golden at the edges.
Notes
- Ensure dough is not sticky before dividing and coloring.
- Use gel food coloring rather than liquid to maintain the dough consistency.
- Freezing the cookie stacks and logs is crucial to keep shapes defined when slicing.
- Wrap logs tightly to avoid freezer burn and preserve freshness.
- You can store sliced cookies in an airtight container for up to a week or freeze unbaked slices for later baking.


