“`html
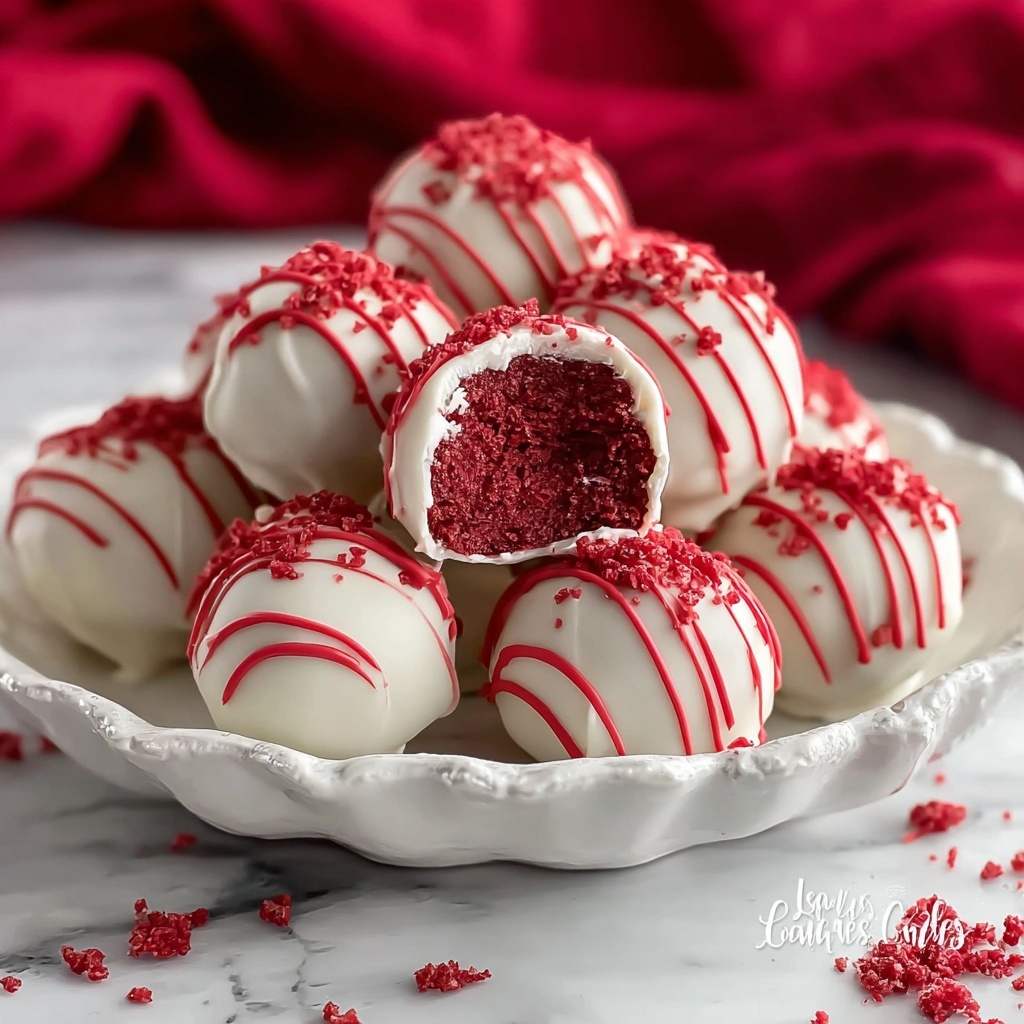
If you have a sweet tooth craving that combines the tender crumb and iconic flavor of classic red velvet with a delightful bite-sized twist, then this Red Velvet Cake Balls Recipe is your next favorite treat waiting to happen. These luscious little cake balls bring together moist cake and creamy, tangy cream cheese frosting enveloped in a smooth white chocolate coating that’s simply irresistible. Whether for a party, a special dessert, or just to satisfy the afternoon munchies, these red velvet cake balls are sure to impress and delight everyone lucky enough to taste them.
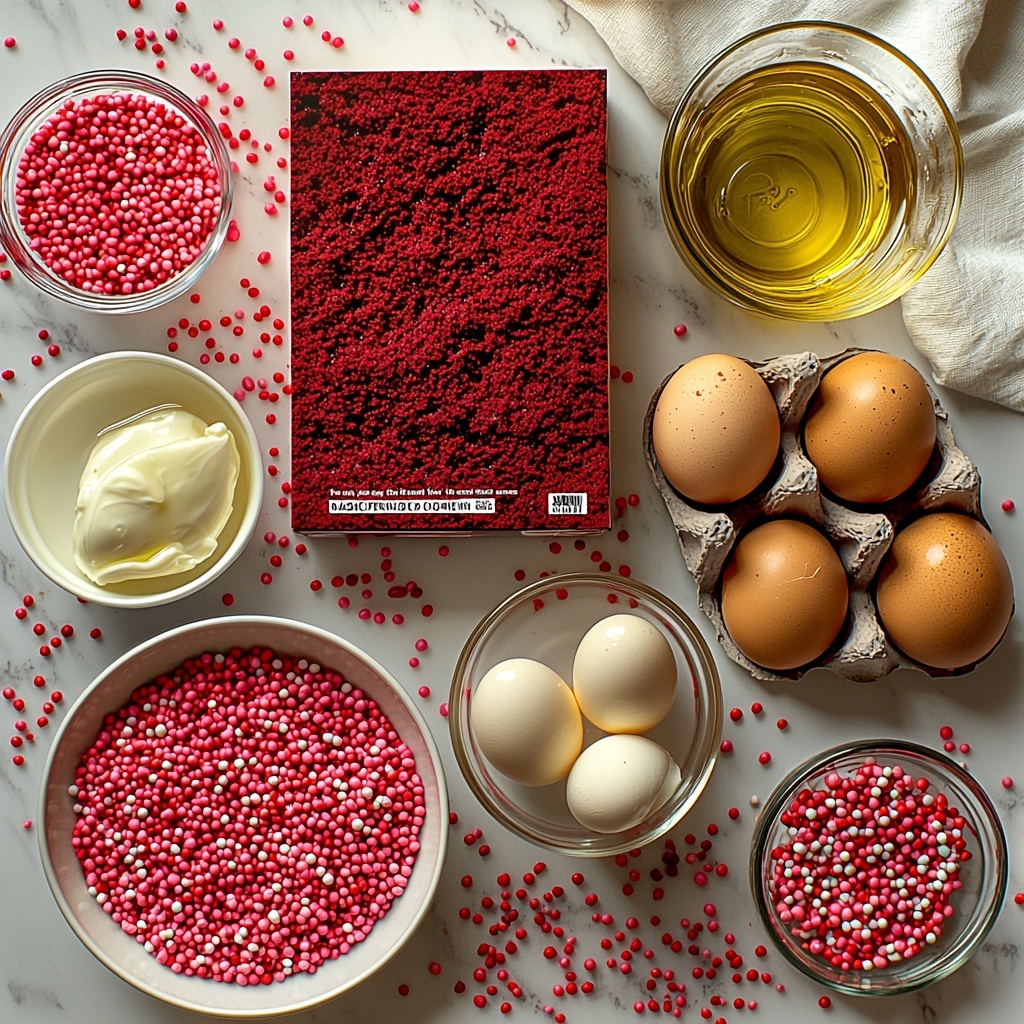
Ingredients You’ll Need
These ingredients come together in a simple but perfectly balanced way, creating the ideal taste, texture, and beautiful red color that make this recipe so special. Each item plays an essential role in achieving the moistness, richness, and creamy finish you’ll love.
- 1 box (15 oz) red velvet cake mix: Provides the deliciously familiar red velvet flavor and soft cake base.
- ½ cup vegetable oil: Keeps the cake tender and moist without overpowering the flavor.
- 1 cup water: Hydrates the cake mix and ensures a light crumb.
- 3 large eggs, room temperature: Adds structure and richness to the cake batter.
- 1 cup full-fat cream cheese, room temperature: Creates the creamy, tangy coating that binds the cake crumbs into bite-sized balls.
- 2 cups white chocolate melting wafers: Offers a smooth, sweet shell to encase the cake balls.
- Red or pink sprinkles for garnish: Adds a festive touch and extra pop of color to your finished treats.
How to Make Red Velvet Cake Balls Recipe
Step 1: Bake the Red Velvet Cake
Start by preparing the red velvet cake exactly as directed on the box—this usually means mixing your cake mix with vegetable oil, water, and eggs, then baking it in a 9×13 inch pan. Baking the cake correctly is crucial, so follow the package temperature and timing to get a moist but cooked-through cake.
Step 2: Cool and Crumble
Once the cake is fully baked, let it cool completely. This cooling step is key to prevent the cream cheese from melting later and to ensure the cake crumbles easily. After cooling, crumble the cake into very fine pieces inside a large bowl. The finer the crumbs, the smoother your cake balls will be.
Step 3: Fold in Cream Cheese
Now add your softened cream cheese to the crumbled cake and fold gently but thoroughly. This mixture will come together into a dense, uniform dough-like consistency that is just sticky enough to hold its shape when rolled into balls.
Step 4: Shape into Balls
Scoop out small portions of the mixture and roll them between your hands to make smooth, round balls. Placing these on a parchment-lined baking sheet makes cleanup easy and prevents sticking.
Step 5: Chill the Cake Balls
Pop the baking sheet with your freshly shaped balls into the freezer for about 30 minutes or until they’re firm. This freezing step ensures that when you dip them into melted chocolate, they hold their shape perfectly and do not fall apart.
Step 6: Melt the White Chocolate
Gently melt the white chocolate melting wafers using a microwave at 50% power, stirring every 20 seconds to prevent burning. Alternatively, you can use a double boiler for a smoother and more controlled melt.
Step 7: Coat the Cake Balls
Carefully dip each chilled cake ball into the melted white chocolate, letting the excess drip off before placing them back on the parchment paper. This method ensures a thin, even chocolate coating without overwhelming the cake.
Step 8: Garnish
Before the coating hardens, sprinkle your red or pink sprinkles on top for a vibrant and festive finish that’s perfect for any occasion!
Step 9: Set and Serve
Let the chocolate fully set at room temperature or in the fridge before serving to maintain that perfect snap when bitten. Now your Red Velvet Cake Balls Recipe is ready to enjoy!
How to Serve Red Velvet Cake Balls Recipe
Garnishes
A shower of red or pink sprinkles adds a delightful burst of color and texture, but you can also experiment with finely chopped nuts or edible glitter for some extra sparkle. These little finishing touches really elevate the look and make your cake balls pop.
Side Dishes
While red velvet cake balls are a treat on their own, they pair beautifully with a cup of rich coffee, a scoop of vanilla ice cream, or fresh berries. The slight bitterness of coffee contrasts wonderfully with the creamy sweetness of the cake balls, making for an indulgent snack or dessert.
Creative Ways to Present
Imagine arranging these cake balls on a decorative platter alongside fresh flowers or inside mini cupcake liners for a charming display. You can also thread them on small skewers with fruit or marshmallows for a fun, edible dessert kabob that’s party-ready.
Make Ahead and Storage
Storing Leftovers
Red velvet cake balls store beautifully in an airtight container in the refrigerator for 3-4 days. Keeping them chilled ensures the cream cheese stays fresh and the chocolate maintains its perfect texture.
Freezing
If you want to keep these treats for longer, freeze them in a single layer on a baking sheet until solid, then transfer to an airtight container or freezer bag. They will last up to 1 month in the freezer, allowing you to have ready-made treats anytime.
Reheating
Since these cake balls are best served chilled, simply remove them from the refrigerator or freezer and allow them to come to room temperature for about 15 minutes before enjoying. Avoid microwaving as it can melt the chocolate shell and alter the creamy texture.
FAQs
Can I use homemade red velvet cake instead of the boxed mix?
Absolutely! Homemade red velvet cake works wonderfully and can add a personal touch, just be sure the cake is completely cooled before crumbling and mixing with the cream cheese.
Is it necessary to use cream cheese, or can I substitute it?
Cream cheese is key for the classic tangy flavor and binding texture in this recipe, but mascarpone or softened butter mixed with a bit of powdered sugar can be an alternative if needed.
What if I don’t have white chocolate melting wafers?
You can substitute white chocolate chips, but may need to add a small amount of shortening to achieve a smooth dipping consistency. Temper the chocolate carefully to avoid clumping.
How big should I make the cake balls?
About 1 to 1½ inches in diameter is ideal—small enough for a perfect bite but large enough to showcase all the flavors and textures balanced in each ball.
Can I use different sprinkles or toppings?
Feel free! Red or pink sprinkles keep it traditional, but crushed candy canes, coconut flakes, or mini chocolate chips can add exciting twists to your cake balls.
Final Thoughts
There’s something so joyful about sharing these Red Velvet Cake Balls Recipe with friends and family—they’re a sweet little celebration in every bite! Once you try making them, you’ll discover how easy and rewarding it is to bring festive flavor to your kitchen with minimal effort. So grab your ingredients, get mixing, and enjoy the smiles these cake balls will bring your way!
“`
Print
Red Velvet Cake Balls Recipe
- Prep Time: 10 minutes
- Cook Time: 30 minutes
- Total Time: 40 minutes
- Yield: 40 servings
- Category: Dessert
- Method: Baking
- Cuisine: American
Description
Delight in these irresistibly creamy and rich Red Velvet Cake Balls, made with moist red velvet cake and smooth cream cheese, coated in luscious white chocolate and decorated with festive sprinkles. Perfect for parties, holidays, or anytime you crave a bite-sized treat with classic red velvet flavor.
Ingredients
Cake
- 1 box (15 oz) red velvet cake mix
- ½ cup vegetable oil
- 1 cup water
- 3 large eggs, room temperature
Filling & Coating
- 1 cup full-fat cream cheese, room temperature
- 2 cups white chocolate melting wafers
- Red or pink sprinkles for garnish
Instructions
- Bake the Cake: Prepare the red velvet cake by combining the cake mix, vegetable oil, water, and eggs according to package instructions. Pour the batter into a 9×13 inch pan and bake at the recommended temperature for about 30 minutes. Once done, allow the cake to cool completely to room temperature.
- Crumble the Cake: Break the cooled cake into fine crumbs in a large mixing bowl, ensuring there are no large chunks for a smooth mixture.
- Mix with Cream Cheese: Add the softened cream cheese to the cake crumbs and fold together evenly until a consistent dough-like mixture forms, suitable for shaping.
- Shape Cake Balls: Using a scoop or your hands, form the mixture into small, uniform balls. Place them onto a parchment-lined baking sheet for easy handling.
- Freeze: Freeze the cake balls for about 30 minutes or until they become firm enough to dip without falling apart.
- Melt Chocolate: Melt the white chocolate melting wafers by microwaving at 50% power, stirring every 20 seconds, or melt gently in a double boiler to ensure smoothness and prevent burning.
- Dip Cake Balls: Dip each chilled cake ball into the melted white chocolate, letting any excess drip off before placing them back onto the parchment paper.
- Decorate: Immediately add red or pink sprinkles on top of each dipped cake ball before the chocolate coating hardens to secure the decoration.
- Set and Serve: Allow the coated cake balls to set completely at room temperature or refrigerate until firm. Serve or store in an airtight container.
Notes
- Ensure cream cheese is fully softened to blend well without lumps.
- Use room temperature ingredients for better mixing and texture.
- Store cake balls in an airtight container in the refrigerator for up to 5 days.
- White chocolate can be substituted with milk or dark chocolate if desired.
- For a firmer outer shell, double dip the cake balls in chocolate.


