
“`html
If you are craving a deliciously satisfying yet guilt-free treat, this Protein Peanut Butter Cups Recipe is an absolute game-changer. Combining rich, velvety semi-sweet chocolate with a creamy, protein-packed peanut butter filling, these cups offer the perfect harmony of indulgence and nutrition. Whether you’re looking for a post-workout snack or a sweet pick-me-up that won’t derail your healthy habits, these homemade peanut butter cups deliver both flavor and energy in every bite.
Ingredients You’ll Need
The beauty of this Protein Peanut Butter Cups Recipe lies in its simplicity. Each ingredient plays a crucial role—from the silky chocolate coating to the smooth, protein-enhanced peanut butter filling—ensuring every mouthful is balanced in taste, texture, and nutrition.
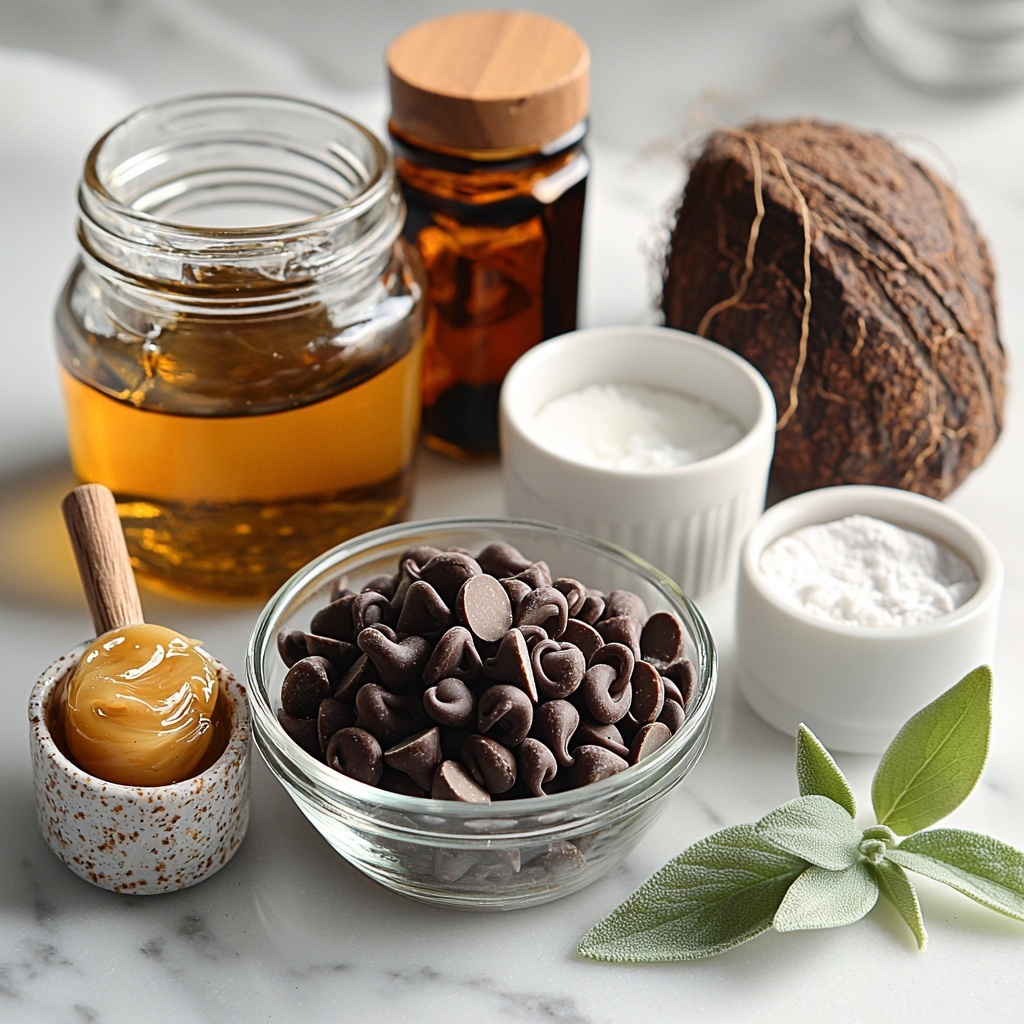
- 12 oz semi-sweet chocolate chips: Provides the luscious chocolate shell that melts in your mouth.
- 1 teaspoon coconut oil (solid): Helps create a glossy, smooth chocolate texture and aids melting.
- 1/4 teaspoon vanilla extract: Adds a subtle depth of flavor to the chocolate.
- 1/4 cup natural creamy peanut butter (ingredients: peanuts + salt only): For a rich, authentic peanut taste that’s both creamy and slightly salty.
- 2 tablespoons pure maple syrup: Naturally sweetens the peanut butter filling without overpowering it.
- 1/3 cup vanilla protein powder: Boosts the nutritional value with a delicious vanilla twist.
- 1/4 teaspoon salt: Enhances the overall flavor and balances the sweetness perfectly.
How to Make Protein Peanut Butter Cups Recipe
Step 1: Prepare the Muffin Tin
Start by lining a muffin tin with parchment paper muffin liners. This simple step prevents sticking and makes the process of removing your peanut butter cups effortless, keeping their shape perfect every time.
Step 2: Melt the Chocolate
Place the semi-sweet chocolate chips and solid coconut oil in a microwave-safe bowl. Heat in 30-second intervals, stirring thoroughly after each session until the chocolate is completely melted and smooth. Then, blend in the vanilla extract to enrich the chocolate’s flavor.
Step 3: Create Chocolate Base Layers
Pour about 1 heaping teaspoon of the melted chocolate into each muffin liner, spreading it evenly to the edges to form a solid chocolate base. This foundation is what gives the cups their classic, satisfying crunch.
Step 4: Chill the Chocolate
Pop the muffin tin into the refrigerator to set the chocolate base firmly while you prepare the peanut butter filling. This ensures the layers stay distinct and delightful.
Step 5: Make the Peanut Butter Filling
Warm the peanut butter in a microwave-safe bowl for 15–20 seconds until it becomes runny. Mix in the vanilla protein powder, salt, and pure maple syrup until smooth and creamy—this filling is where the magic happens, combining sweetness with protein-packed goodness.
Step 6: Assemble Peanut Butter Discs
Divide the mixture into 12 portions, shaping each into a disc slightly smaller than the muffin liner. Hand-shaping the discs helps them fit perfectly within the chocolate base and makes the final treat look irresistibly homemade.
Step 7: Add Filling to Cups
Take the muffin tin out of the fridge and place one peanut butter disc on top of each chocolate base, layering your cups like a pro.
Step 8: Add Remaining Chocolate
If your melted chocolate has thickened at this point, zap it for another 15–20 seconds to loosen it up. Drizzle the remaining chocolate over each peanut butter disc, smoothing it out to the edges to seal everything inside beautifully.
Step 9: Chill Until Set
Return the muffin tin to the refrigerator for at least one hour. This chilling period allows the chocolate and peanut butter layers to firm up perfectly, resulting in those classic, sturdy peanut butter cups that everyone loves.
How to Serve Protein Peanut Butter Cups Recipe
Garnishes
For an eye-catching touch, sprinkle a pinch of flaky sea salt or crushed roasted peanuts on top right after drizzling the final chocolate layer. This adds an attractive texture contrast that enhances every bite without overpowering the core flavors.
Side Dishes
Serve these peanut butter cups alongside a fresh fruit salad or a refreshing smoothie for a balanced treat session. The natural fruit sweetness pairs beautifully with the rich texture of the cups, making it perfect for dessert or an energizing snack.
Creative Ways to Present
If you want to wow your friends, place these cups in colorful mini muffin liners or arrange them on a decorative platter lined with parchment paper. You might also experiment by adding a drizzle of dark chocolate or a dusting of cocoa powder for an elegant finish.
Make Ahead and Storage
Storing Leftovers
Keep any leftover Protein Peanut Butter Cups Recipe treats in an airtight container in the refrigerator where they will stay fresh and delicious for 3-4 days. This way, you can enjoy them at your convenience without losing that perfect texture and flavor.
Freezing
If you want to store them longer, freezing is your best friend. Place the cups in a sealed container or freezer bag, separating layers with parchment paper to prevent sticking, and freeze for up to a month. When you’re ready to indulge, simply thaw in the refrigerator for a few hours.
Reheating
Since these cups are best enjoyed chilled, reheating is generally unnecessary. However, if you’d like a softer texture, letting them sit at room temperature for about 10 minutes works wonders, bringing out the creamy peanut butter filling’s silky softness.
FAQs
Can I use a different type of protein powder?
Absolutely! While vanilla protein powder adds a wonderful flavor, you can use chocolate, unflavored, or any protein powder you prefer. Just be mindful of the sweetness and adjust maple syrup accordingly.
Is natural peanut butter essential?
Yes, using natural creamy peanut butter made with just peanuts and salt ensures a clean, authentic taste without added sugars or oils that could affect texture and flavor.
What if I don’t have coconut oil?
You can substitute coconut oil with a neutral oil like vegetable or canola oil, but coconut oil is preferred for its solid state at room temperature, helping chocolate set beautifully.
How do I prevent the chocolate from seizing when melting?
Microwaving in short intervals and stirring frequently keeps the chocolate smooth. Avoid getting any water into the chocolate or overheating, which can cause it to seize.
Can I make these cups vegan?
Yes! Use dairy-free chocolate chips and a plant-based protein powder, along with maple syrup and natural peanut butter, to keep the recipe deliciously vegan and protein-packed.
Final Thoughts
If you’re after a treat that feels indulgent but fuels your day, this Protein Peanut Butter Cups Recipe is a perfect match. Easy to make and even easier to enjoy, it’s perfect for sharing with friends or savoring as your go-to snack. Give it a try—you’re going to love how these cups satisfy both your sweet tooth and your protein goals!
“`
Print
Protein Peanut Butter Cups Recipe
- Prep Time: 15 minutes
- Cook Time: 10 minutes
- Total Time: 1 hour 20 minutes
- Yield: 12 servings
- Category: Dessert
- Method: No-Cook
- Cuisine: American
- Diet: Low Fat
Description
Delicious and protein-packed peanut butter cups made with creamy natural peanut butter, semi-sweet chocolate, vanilla protein powder, and a touch of maple syrup. These homemade treats are perfect for a healthy snack or dessert, combining rich chocolate with a smooth peanut butter filling for a satisfying and nutritious indulgence.
Ingredients
Chocolate Layer
- 12 oz semi-sweet chocolate chips
- 1 teaspoon solid coconut oil
- 1/4 teaspoon vanilla extract
Peanut Butter Filling
- 1/4 cup natural creamy peanut butter (ingredients: peanuts + salt only)
- 2 tablespoons pure maple syrup
- 1/3 cup vanilla protein powder
- 1/4 teaspoon salt
Instructions
- Prepare the Muffin Tin: Line a muffin tin with parchment paper muffin liners to prevent sticking and allow easy removal of the peanut butter cups later.
- Melt the Chocolate: Place the chocolate chips and solid coconut oil in a microwave-safe bowl. Microwave in 30-second intervals, stirring after each, until the chocolate is fully melted and smooth. Stir in the vanilla extract once melted.
- Create Chocolate Base Layers: Spoon 1 heaping teaspoon of melted chocolate into each muffin liner. Spread the chocolate evenly to the edges forming a flat base layer in each cup. Repeat for all 12 cups.
- Chill the Chocolate: Refrigerate the muffin tin to allow the chocolate base layers to set and firm up while you prepare the filling.
- Make the Peanut Butter Filling: Warm the peanut butter in a microwave-safe bowl for 15–20 seconds to make it runny. Add vanilla protein powder, salt, and pure maple syrup and stir thoroughly until the mixture is smooth and creamy.
- Assemble Peanut Butter Discs: Divide the peanut butter mixture into 12 equal portions and shape each into a disc slightly smaller than the muffin liner.
- Add Filling to Cups: Remove the muffin tin from the refrigerator and place one peanut butter disc on top of each set chocolate base layer.
- Add Remaining Chocolate: Reheat the remaining melted chocolate if it has thickened by microwaving for 15-20 seconds. Drizzle the chocolate over each peanut butter disc and spread evenly to the edges, sealing the peanut butter filling inside.
- Chill Until Set: Refrigerate the muffin tin again for at least one hour or until the entire peanut butter cups are firm and fully set.
- Serve and Store: Serve immediately or keep leftovers in an airtight container in the refrigerator or freezer for future snacking.
Notes
- Line muffin tin with parchment liners to avoid sticking.
- Gently warm peanut butter for easier mixing.
- If chocolate thickens, reheat briefly to maintain smooth texture.
- Store finished cups refrigerated or frozen to keep firm.
- Adjust sweetness by varying maple syrup amount to taste.


