
If you have a sweet tooth and a nostalgia for those carnival treats, then you are absolutely going to adore this No-Churn Cotton Candy Ice Cream Recipe. It transforms the ethereal, sugary magic of cotton candy into a creamy, dreamy dessert that you can whip up at home without an ice cream maker. The velvety texture combined with the playful hints of pink and blue, plus the subtle cotton candy flavor, will make this icy delight the star of any gathering. Trust me, once you taste this, you’ll want to keep a batch in your freezer at all times!
Ingredients You’ll Need
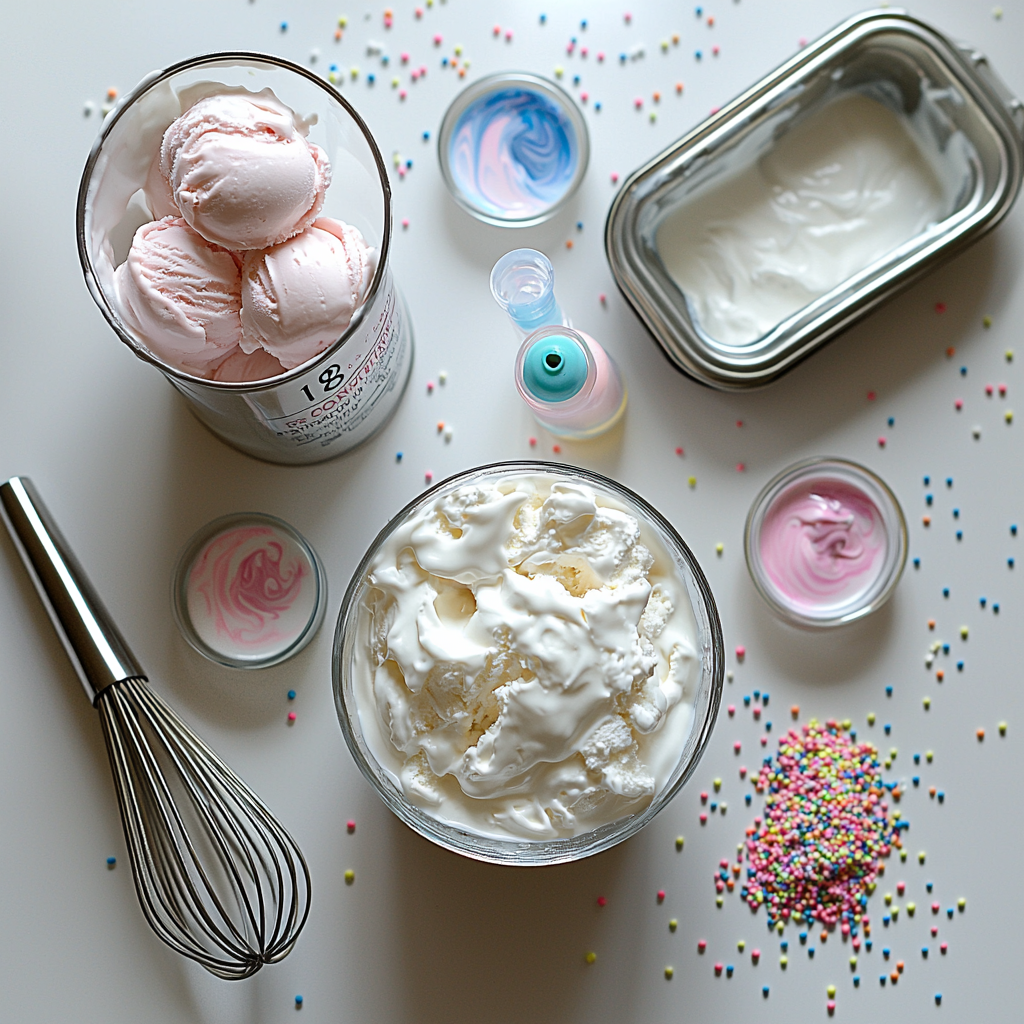
Getting started with this No-Churn Cotton Candy Ice Cream Recipe is a breeze because it calls for just a few essential ingredients, each contributing perfectly to the luscious texture and fun flavor. These simple components work together to give you that creamy base and unmistakable cotton candy sweetness.
- 2 cups very cold heavy whipping cream: The foundation of the ice cream, providing rich creaminess and the perfect amount of air when whipped to stiff peaks.
- 1 14-ounce can sweetened condensed milk (cold): Adds natural sweetness and a smooth finish while helping to bind the ice cream without needing an ice cream maker.
- 2 teaspoons cotton candy flavoring: This special ingredient transforms the flavor into that fun, carnival-inspired cotton candy taste everyone loves.
- Food coloring in pink and blue (optional): Adds whimsical, vibrant colors to your ice cream, enhancing the playful cotton candy vibe visual appeal.
How to Make No-Churn Cotton Candy Ice Cream Recipe
Step 1: Chill Your Tools and Ingredients
Before diving into mixing, start by placing your loaf pan, a large mixing bowl, and your whisk (or stand mixer bowl) into the freezer for about 30 minutes. Make sure both your heavy whipping cream and sweetened condensed milk are very cold, as this helps the cream whip up beautifully and keeps the ice cream texture smooth. This simple chilling step is the secret to that dreamy, soft texture that melts in your mouth.
Step 2: Whip the Cream
Once everything is chilled, beat the heavy whipping cream until it forms stiff peaks. This takes approximately 4 minutes if you’re using a stand mixer. The cream must be whipped just right—it should be airy and stable but not overbeaten—because it’s the fluffiness of the whipped cream that will create that luscious, melt-in-your-mouth feel in the finished ice cream.
Step 3: Combine Condensed Milk and Flavoring
In a separate bowl, stir together the cold sweetened condensed milk with 2 teaspoons of cotton candy flavoring until perfectly smooth. This mixture infuses the creamy base with that unmistakable cotton candy taste, setting it apart from your everyday ice cream flavors.
Step 4: Fold the Mixtures Gently
Gradually add the condensed milk mixture to the whipped cream by gently folding it in. The key word here is gentle—folding preserves all that beautiful air you’ve whipped into the cream, ensuring your ice cream stays light and fluffy rather than dense and heavy.
Step 5: Divide and Color Your Ice Cream Base
Split the mixture into two equal parts, approximately 3 cups each. Color one bowl with pink food coloring and the other with blue food coloring. This colorful division is what gives the No-Churn Cotton Candy Ice Cream Recipe its delightful, whimsical appearance, reminiscent of childhood fairs and celebrations.
Step 6: Layer the Ice Cream in a Loaf Pan
Take your chilled loaf pan out of the freezer and spoon the pink and blue mixtures into the pan in dollops, alternating colors. This creates a beautiful swirled or marbled effect that’s not only fun to look at but also a joy to eat.
Step 7: Add Some Sprinkles Magic (Optional)
If you want to take your cotton candy ice cream from delicious to dazzling, sprinkle the top with your favorite fun sprinkles or jimmies. They add a festive crunch and brighten up the presentation, making the ice cream irresistible, especially for kids and the young at heart.
Step 8: Freeze Overnight
Pop the pan into the freezer and let the magic happen overnight, or for at least 8 hours. This resting time allows the ice cream to firm up just right while locking in all those luscious flavors and vibrant colors so that you can serve a perfectly set treat.
How to Serve No-Churn Cotton Candy Ice Cream Recipe
Garnishes
Serve your No-Churn Cotton Candy Ice Cream Recipe with a sprinkle of rainbow sprinkles or edible glitter for extra sparkle. Fresh berries or a drizzle of berry sauce can add a nice contrasting tang that balances the sweetness beautifully. Even a few mini cotton candy puffs on top will amp up the fun factor!
Side Dishes
This ice cream pairs wonderfully with light, airy desserts like angel food cake or crispy waffle cones. For a more indulgent treat, it’s fantastic alongside warm brownies or a hot fudge drizzle—contrast in temperatures and textures will delight every bite.
Creative Ways to Present
Try layering the ice cream into parfait glasses with crushed cookies and sprinkles for a colorful, layered dessert. Or scoop it into playful cotton candy-shaped mounds using a melon baller, then top with tiny umbrellas for a carnival-themed party. Using colorful popsicle sticks and freezing in molds is another charming way to serve this ice cream as frozen treats!
Make Ahead and Storage
Storing Leftovers
Store any leftover No-Churn Cotton Candy Ice Cream Recipe in an airtight container in the freezer. To maintain the best quality and flavor, consume it within 3 to 4 days. Keeping it sealed tight prevents ice crystals from forming and keeps your ice cream creamy and smooth.
Freezing
This ice cream freezes beautifully without the need for stirring or ice cream churners. Just make sure it is covered well with plastic wrap or a lid to avoid absorbing other freezer odors. Overnight freezing is perfect, but for best texture, enjoy within a few days once frozen solid.
Reheating
Since this is a frozen treat, reheating is not recommended. Instead, allow the ice cream to sit out at room temperature for about 5 to 10 minutes before serving if it feels too firm straight from the freezer. This brief resting time makes scooping easier while keeping all that luscious texture intact.
FAQs
Can I use different flavorings instead of cotton candy?
Absolutely! This No-Churn Cotton Candy Ice Cream Recipe is very versatile. You can swap out the cotton candy flavoring for vanilla, strawberry, or even peppermint to create different delicious variations at home.
Do I have to use food coloring?
Food coloring is entirely optional but highly recommended if you want that classic cotton candy look. If you prefer, you can leave it out and still enjoy a deliciously flavored ice cream with a creamy white color.
How do I achieve stiff peaks with heavy cream?
Make sure your heavy cream and tools are very cold before whipping. Beat the cream on medium-high speed until the edges of the mixture start to hold shape and the peaks stand firmly without collapsing.
Can I prepare this ice cream without a stand mixer?
Yes, you can whip the cream using a hand mixer or even a sturdy whisk, although it may take a bit longer. Just be patient and whip until you reach stiff peaks for the best results.
Will the ice cream be very sweet?
This no-churn ice cream is moderately sweet thanks to the sweetened condensed milk and cotton candy flavoring, but it’s well balanced by the richness of the cream. You can adjust sweetness slightly by varying the amount of condensed milk if desired.
Final Thoughts
Ready to bring a burst of carnival fun and creamy delight to your kitchen? This No-Churn Cotton Candy Ice Cream Recipe is a wonderfully simple yet dazzling treat that’s sure to brighten any occasion. Whether you’re making it for a party, as a special dessert for the family, or just because you deserve a sweet pick-me-up, it’s guaranteed to impress. Don’t hesitate to try it—you’ll love how easy and joyful creating homemade ice cream can be!
Print
No-Churn Cotton Candy Ice Cream Recipe
- Prep Time: 40 minutes
- Cook Time: 0 minutes
- Total Time: 8 hours 40 minutes
- Yield: 6 servings
- Category: Dessert
- Method: No-Cook
- Cuisine: American
Description
This delightful No-Churn Cotton Candy Ice Cream is a fun and easy homemade treat that captures the sweet, airy flavor of cotton candy without the need for an ice cream maker. Combining cold heavy whipping cream and sweetened condensed milk with cotton candy flavoring, this recipe creates a creamy, dreamy dessert perfect for summer days or any time you want a nostalgic sweet treat. Optional food coloring and sprinkles add a playful twist, making it a visually stunning and delicious indulgence.
Ingredients
Ice Cream Base
- 2 cups very cold heavy whipping cream
- 1 (14-ounce) can sweetened condensed milk, cold
- 2 teaspoons cotton candy flavoring
Optional Additions
- Food coloring in pink and blue
- Fun sprinkles or jimmies for topping
Instructions
- Prepare Equipment and Ingredients: Place your loaf pan, a large mixing bowl, and a whisk in the freezer for about 30 minutes prior to starting. Ensure both the heavy whipping cream and sweetened condensed milk are very cold to achieve the best whipping results.
- Whip the Cream: Using the chilled large bowl or a stand mixer bowl, beat the cold heavy whipping cream on medium-high speed until stiff peaks form. This usually takes about 4 minutes. The whipped cream should hold its shape firmly.
- Combine Condensed Milk and Flavoring: In a separate medium bowl, stir together the cold sweetened condensed milk and 2 teaspoons of cotton candy flavoring until thoroughly combined and smooth.
- Fold Mixtures Together: Gradually add the sweetened condensed milk mixture to the whipped cream by gently folding it in. This careful folding preserves the airiness of the whipped cream, resulting in a light and fluffy ice cream texture.
- Divide and Color Mixture: Divide the combined ice cream base evenly into two separate bowls, about 3 cups each. Add pink food coloring to one bowl and blue food coloring to the other, mixing lightly to swirl or fully color as desired.
- Layer Ice Cream in Pan: Remove the chilled loaf pan from the freezer. Spoon dollops of each colored ice cream mixture into the pan, alternating between pink and blue to create a fun marbled or layered effect.
- Add Toppings (Optional): If desired, sprinkle the top of the ice cream with fun sprinkles or jimmies for added color and texture before freezing.
- Freeze Overnight: Cover the loaf pan with plastic wrap or a lid and freeze for at least 8 hours or overnight to allow the ice cream to set properly.
Notes
- For best results, make sure all dairy ingredients and utensils are very cold before starting.
- Gently folding the condensed milk mixture into whipped cream is key to keeping the ice cream light and airy.
- Feel free to experiment with different food coloring or add-ins like edible glitter for a more festive look.
- This ice cream does not contain eggs or require churning, making it a quick and simple homemade ice cream option.
- Store leftovers in an airtight container in the freezer for up to 1 week.


