“`html
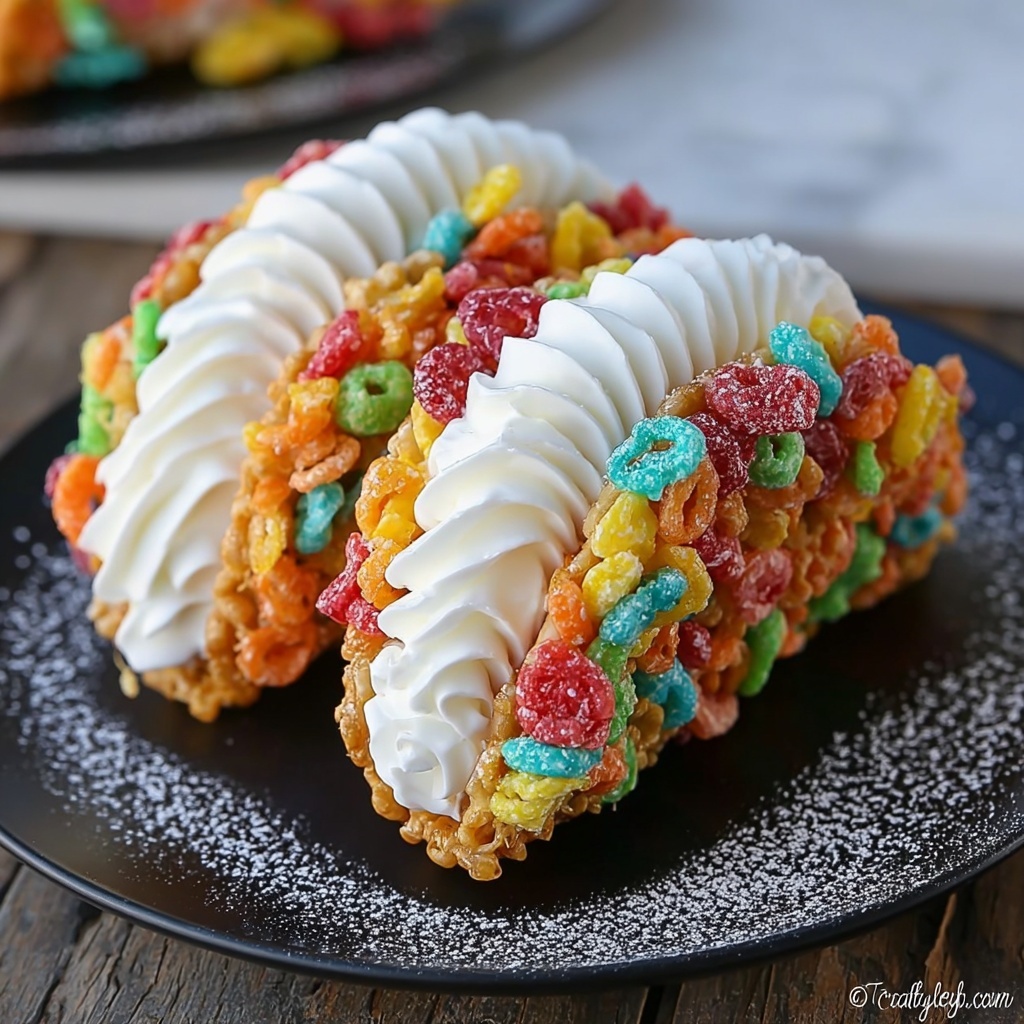
If you have a sweet tooth and love a playful twist on classic desserts, the Fruity Pebbles Cheesecake Tacos Recipe is going to become your new obsession. Imagine crunchy, colorful Fruity Pebbles cereal shaped into a taco shell, filled with a luxuriously creamy cheesecake filling that melts in your mouth. This dessert is fun for all ages and perfect for when you want to wow your friends or family with something vibrant and utterly delicious. From the bright cereal crust to the smooth filling and fresh berry toppings, every bite bursts with flavor and texture that feels like a celebration.
Ingredients You’ll Need
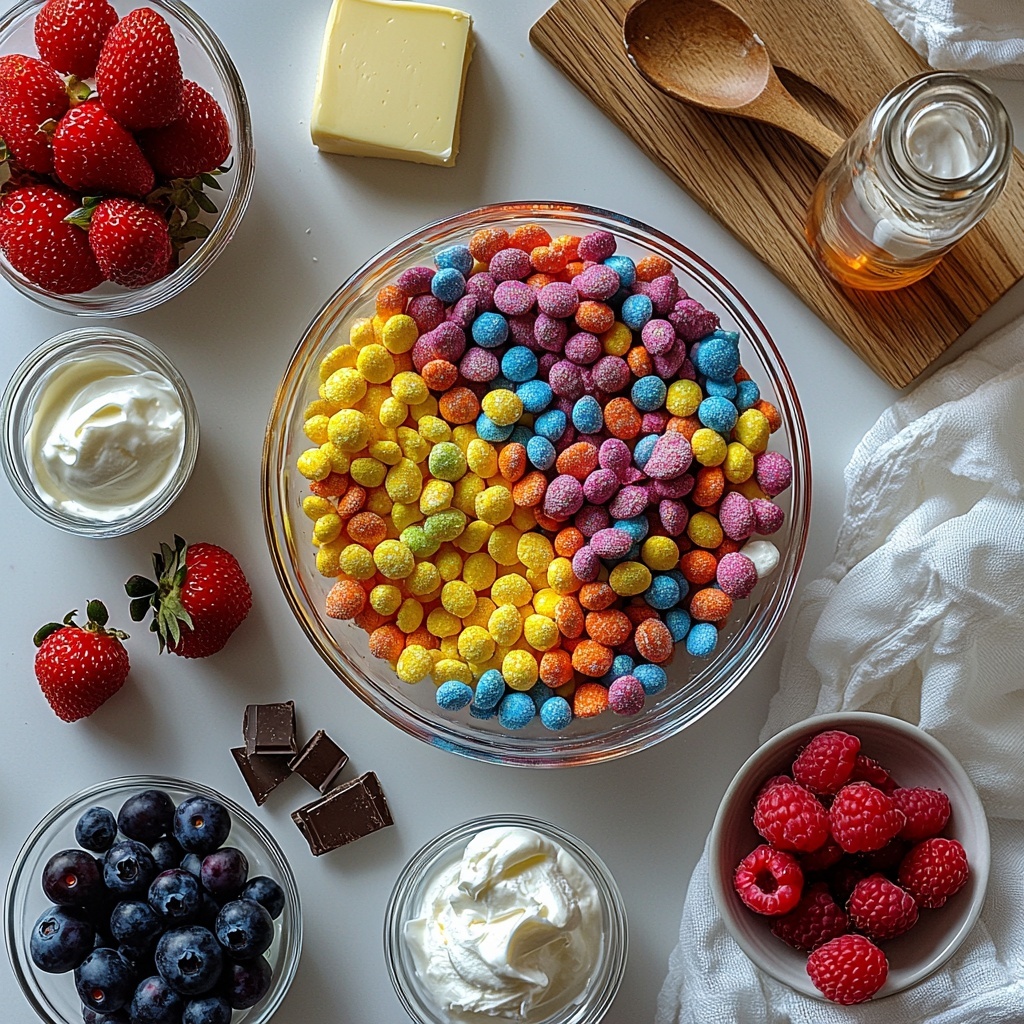
This recipe uses simple, everyday ingredients that come together to create a dessert full of color, crunch, and creamy indulgence. Each component is essential, balancing sweetness, texture, and freshness to make the perfect Fruity Pebbles cheesecake taco.
- 2 cups Fruity Pebbles cereal: For the vibrant, crispy taco shells that bring both color and crunch.
- 2 tablespoons unsalted butter, melted: Adds richness and helps bind the crushed cereal crust.
- 1 tablespoon granulated sugar: A touch of sweetness to enhance the taco shells.
- 8 ounces cream cheese, softened: The star of the cheesecake filling, providing smooth, creamy texture.
- 1/2 cup granulated sugar: Sweetens the cheesecake filling perfectly.
- 1/4 cup sour cream: Adds tanginess and helps keep the filling light and luscious.
- 1 teaspoon vanilla extract: Deepens the flavor of the filling with comforting warmth.
- 1/4 cup heavy cream: Whipped into the filling for fluffy, dreamy texture.
- 1 cup Fruity Pebbles cereal, finely crushed: For coating the edges of the taco shells, adding an extra burst of color and crunch.
- Whipped cream: To top off the tacos for a soft, airy finish.
- Fresh berries (strawberries, blueberries, raspberries): To add natural sweetness, color, and a fresh contrast to the creamy filling.
- Chocolate shavings: Optional but highly recommended for a touch of elegance and extra flavor.
- Extra Fruity Pebbles cereal: To sprinkle for extra fun and decoration.
How to Make Fruity Pebbles Cheesecake Tacos Recipe
Step 1: Prepare the Fruity Pebbles Taco Shells
Start by finely grinding 2 cups of Fruity Pebbles cereal using a food processor or by crushing them in a bag with a rolling pin. This creates the base texture for your taco shells. Then, mix the crushed cereal with melted butter and sugar until well combined—this mixture forms the crust that will hold your filling.
Step 2: Bake and Shape the Taco Shells
Preheat your oven to 350°F (175°C) and line a baking sheet with parchment paper. Press about 2 tablespoons of the cereal mixture into 4-5 inch circles, spacing them apart. Bake for 8-10 minutes until the edges turn lightly golden. Working while the shells are still warm, gently lift and drape each circle over a bar or muffin tin to shape into a taco shell. Let them cool completely to harden.
Step 3: Make the Cheesecake Filling
Make sure your cream cheese is completely softened before starting. In a bowl, beat the cream cheese and sugar until creamy. Then add sour cream and vanilla extract, mixing well. Gradually incorporate the heavy cream and beat until the filling is fluffy and light. Refrigerate the filling for at least 30 minutes to help it firm up slightly, making it easier to fill the shells.
Step 4: Coat and Fill Your Taco Shells
Crush 1 cup of Fruity Pebbles cereal and pour them into a shallow dish. Dip the edges of each taco shell into the crushed cereal, pressing gently to coat and add extra crunchy color. Spoon or pipe the chilled cheesecake filling into each taco shell, filling generously for that luscious bite every time.
Step 5: Decorate and Finish
Top each cheesecake taco with dollops of whipped cream, fresh berries, chocolate shavings, and a sprinkle of extra Fruity Pebbles for a pop of vibrant fun. These finishing touches make the dessert look as amazing as it tastes!
How to Serve Fruity Pebbles Cheesecake Tacos Recipe
Garnishes
Garnishing your Fruity Pebbles Cheesecake Tacos Recipe is where you can get creative. Fresh berries like strawberries, blueberries, and raspberries add juicy bursts of flavor and brighten the overall appearance. Whipped cream adds a soft cloud of sweetness, and chocolate shavings provide a lovely contrast in both texture and taste. Don’t hesitate to add a little extra cereal sprinkle—it makes the tacos feel festive and cheerful.
Side Dishes
Since these cheesecake tacos are quite rich and sweet, they pair wonderfully with simple, light sides like fresh fruit salad or a small scoop of sorbet. A cold glass of milk or a fruity iced tea can complement the dessert perfectly and help cleanse the palate.
Creative Ways to Present
Presentation can elevate this fun dessert experience. Serve the tacos standing in a taco holder for a playful touch, or arrange them on a bright platter layered with fruit and edible flowers. You might even try serving them in small mason jars or clear cups as parfait-style treats, layering cheesecake filling and crushed cereals with fresh berries for a portable party snack.
Make Ahead and Storage
Storing Leftovers
If you have any leftover Fruity Pebbles Cheesecake Tacos, store them in an airtight container in the refrigerator. Because of the delicate cereal shells, they’re best enjoyed within 3-4 days to keep the texture crisp and the filling fresh.
Freezing
While the cheesecake filling can be frozen separately, the taco shells will lose their crunch once frozen and thawed. For the best experience with the Fruity Pebbles Cheesecake Tacos Recipe, freeze leftover filling in an airtight container for up to 1 month and thaw in the refrigerator before assembling fresh taco shells.
Reheating
Reheating is not recommended for these tacos, as the shell’s crispiness is a big part of their charm and will be lost with heat. Instead, serve chilled or at room temperature for optimum enjoyment.
FAQs
Can I use other cereals besides Fruity Pebbles?
Absolutely! Fruity Pebbles are iconic here for their color and crunch, but you can try other crisp, colorful cereals if you want a different flavor. Just be sure the cereal can hold shape when baked for the shells.
How do I soften cream cheese quickly?
If you’re in a hurry, cut cream cheese into smaller chunks and let it sit at room temperature for about 20 minutes or microwave briefly in 5-second bursts to avoid melting.
Can these tacos be made gluten-free?
Yes, Fruity Pebbles cereal is naturally gluten-free, but double-check the brand you buy. The other ingredients are also gluten-free, making this dessert a tasty gluten-free treat.
What’s the best way to crush the cereal without a food processor?
Place the cereal in a sturdy zip-top bag and gently crush it with a rolling pin or meat mallet until finely ground. This manual method works wonderfully and is quick too.
Can I prepare the taco shells ahead of time?
You can bake the shells ahead and store them in an airtight container at room temperature for up to 2 days. Just dip and fill them with cheesecake filling right before serving for the best texture and flavor.
Final Thoughts
This Fruity Pebbles Cheesecake Tacos Recipe is a playful, downright delicious dessert that’s sure to brighten any occasion. It brings together nostalgia, creative fun, and the perfect balance of creamy and crunchy textures all in one colorful bite. Give it a try and prepare to impress your loved ones with a dessert that tastes as joyful as it looks!
“`
Print
Fruity Pebbles Cheesecake Tacos Recipe
- Prep Time: 30 minutes
- Cook Time: 10 minutes
- Total Time: 1 hour
- Yield: 8 servings
- Category: Dessert
- Method: Baking
- Cuisine: American
Description
Fruity Pebbles Cheesecake Tacos are a fun and colorful dessert featuring crispy Fruity Pebbles taco shells filled with creamy, fluffy cheesecake filling. These playful treats are topped with whipped cream, fresh berries, chocolate shavings, and extra Fruity Pebbles for added texture and vibrant flavor, making them perfect for parties or a whimsical sweet snack.
Ingredients
Fruity Pebbles Taco Shells
- 2 cups Fruity Pebbles cereal
- 2 tablespoons unsalted butter, melted
- 1 tablespoon granulated sugar
Cheesecake Filling
- 8 ounces cream cheese, softened
- 1/2 cup granulated sugar
- 1/4 cup sour cream
- 1 teaspoon vanilla extract
- 1/4 cup heavy cream
Toppings and Decoration
- 1 cup Fruity Pebbles cereal, finely crushed
- Whipped cream
- Fresh berries (strawberries, blueberries, raspberries)
- Chocolate shavings
- Extra Fruity Pebbles cereal
Instructions
- Grind Cereal: In a food processor, pulse 2 cups of Fruity Pebbles cereal until finely ground. Alternatively, place the cereal in a zip-top bag and crush with a rolling pin.
- Mix Shell Ingredients: In a medium bowl, combine the crushed Fruity Pebbles, melted butter, and 1 tablespoon granulated sugar. Mix thoroughly until the mixture is evenly coated.
- Prepare Baking Sheet: Preheat your oven to 350°F (175°C). Line a baking sheet with parchment paper for easy removal of shells.
- Form Taco Shells: Press about 2 tablespoons of the Fruity Pebbles mixture onto the prepared baking sheet in circles approximately 4-5 inches in diameter. Space the circles about 1 inch apart to allow heat circulation and prevent sticking.
- Bake Shells: Bake for 8-10 minutes or until the edges are lightly golden brown and the shells are firm to touch.
- Shape Shells: Remove from oven and let circles cool slightly for 1-2 minutes. While still warm and pliable, carefully lift each circle and drape it over the bar of an oven rack or edge of a muffin tin to create a taco shell shape.
- Cool Shells: Allow the taco shells to cool completely and harden, about 15-20 minutes, before gently removing them from the shaping surface.
- Soften Cream Cheese: Ensure your cream cheese is fully softened at room temperature for best mixing results.
- Mix Cream Cheese Base: In a large bowl, use an electric mixer to beat the softened cream cheese and 1/2 cup granulated sugar together until smooth and creamy.
- Add Sour Cream and Vanilla: Mix in the sour cream and vanilla extract until fully combined and homogeneous.
- Incorporate Heavy Cream: Gradually add the heavy cream, beating continuously until the filling becomes light, airy, and fluffy.
- Chill Filling: Cover the bowl with plastic wrap and refrigerate the cheesecake filling for at least 30 minutes to allow it to firm up slightly for easier filling.
- Prepare Crushed Cereal for Edges: Place 1 cup Fruity Pebbles cereal in a zip-top bag and crush finely with a rolling pin or meat mallet. Pour into a shallow dish.
- Coat Shell Edges: Dip the edges of each taco shell into the crushed Fruity Pebbles, pressing gently to adhere the cereal pieces to the edges for added texture and color.
- Fill Taco Shells: Remove the chilled cheesecake filling from the refrigerator. Spoon or pipe the filling generously into each Fruity Pebbles taco shell.
- Decorate Tacos: Top the filled tacos with whipped cream, fresh berries, chocolate shavings, and sprinkle extra Fruity Pebbles cereal on top for vibrant flair.
- Serve Immediately: For the best taste and crunchy texture, serve the Fruity Pebbles Cheesecake Tacos immediately after assembling.
Notes
- To soften cream cheese quickly, leave it at room temperature for about 30 minutes before mixing.
- If taco shells harden too much and crack during shaping, warm them slightly to regain pliability.
- Use a piping bag to fill the shells neatly and create an attractive presentation.
- Customize toppings by adding nuts or other fresh fruits according to personal preference.
- Store assembled tacos in the refrigerator and consume within 24 hours to maintain freshness and prevent sogginess.

