If you’re searching for a delightful, refreshing treat that is as charming to make as it is to enjoy, then you have truly found a gem with this Easy Peppermint Creams Recipe. These little bursts of minty sweetness are perfect whether you’re aiming to impress guests at a holiday gathering or just craving a classic candy that melts in your mouth. With a simple list of ingredients and straightforward steps, this recipe offers a perfect balance of zesty lemon, cool peppermint, and optional chocolate indulgence, bringing a magical touch to your homemade confections.
Ingredients You’ll Need
Gathering your ingredients is the first exciting step in making Easy Peppermint Creams Recipe come to life. Each component plays a special role from adding sweetness and texture to delivering that unmistakable minty flavor and even a touch of sparkle.
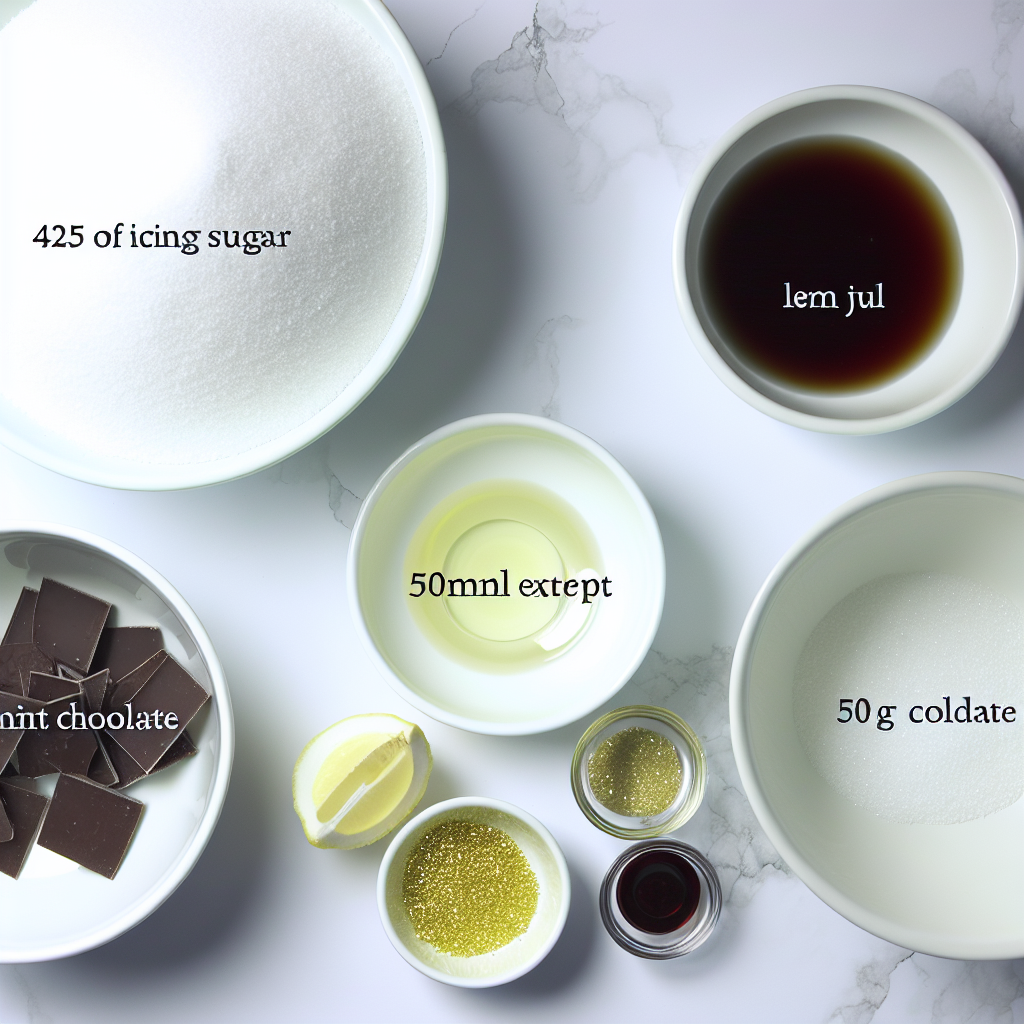
- Icing sugar (425 g): This finely powdered sugar forms the sweet, smooth base of your creams, ensuring the perfect melt-in-your-mouth texture.
- Lemon juice (50 ml): A splash of lemon juice adds a subtle tangy contrast that brightens up the peppermint flavor and helps bind the ingredients.
- Peppermint extract (½ tsp): The star of the show, a little goes a long way to infuse the creams with that classic refreshing mint taste.
- Dark chocolate (50 g) (optional): Although optional, a few drizzles or dips in dark chocolate elevate these creams into a sophisticated treat with a rich finish.
- Edible glitter, icing shapes, or golden sugar (optional): For that extra festive touch, these decorations make your creams as beautiful as they are delicious.
How to Make Easy Peppermint Creams Recipe
Step 1: Sift the Icing Sugar
Start by sieving your icing sugar to remove any lumps—this is crucial for achieving the smooth, creamy texture that melts so perfectly on the tongue. Taking this little extra step ensures your peppermint creams won’t be grainy or uneven.
Step 2: Add Lemon Juice Gradually
Pour in the lemon juice a little at a time while stirring continuously. You’ll want to reach a crumbly mixture that’s not sticky – this is a delicate balance that sets up the ideal consistency for shaping your creams.
Step 3: Incorporate Peppermint Extract
Add in a few drops of peppermint extract and mix well. This step brings your creams to life by infusing that unmistakably fresh flavor that makes peppermint creams so beloved.
Step 4: Knead the Mixture Into a Smooth Ball
Wash your hands and knead the mixture gently until it becomes smooth and holds together in a ball. If it’s still crumbly, add a bit more lemon juice. If it becomes sticky, dust with extra icing sugar—stay mindful to avoid overcorrecting to keep that perfect texture.
Step 5: Roll Out the Dough
Lightly dust your countertop and rolling pin with icing sugar to prevent sticking, then roll your dough to about 5mm thick. This thickness gives a lovely bite—not too thin to break easily and not too thick for the cream to lose its delicate melt.
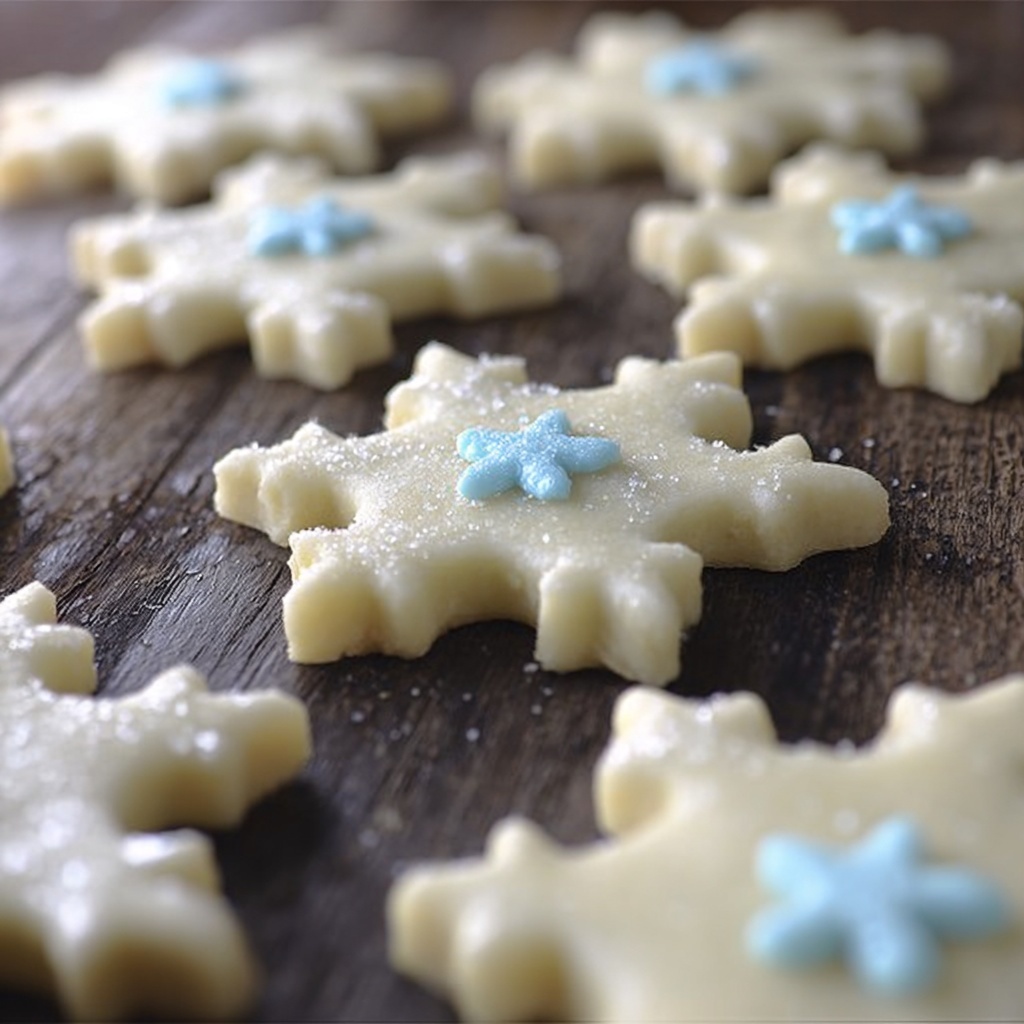
Step 6: Cut Out Your Shapes
Using cookie cutters, cut your dough into festive or fun shapes such as hearts, snowflakes, or stars. This is where your creativity shines and adds a personal touch to your candies.
Step 7: Let Your Creams Dry
Place your shapes on baking parchment and leave them to dry at room temperature for at least half an hour. This drying time helps the creams set just enough to hold their shape but stay soft and delightful to eat.
How to Serve Easy Peppermint Creams Recipe
Garnishes
Serving these peppermint creams with a sprinkle of edible glitter or a dusting of golden sugar makes them visually enchanting and adds a subtle shimmer that catches the light beautifully. You can also dip or drizzle them with melted dark chocolate for a decadent contrast that highlights the mint flavor spectacularly.
Side Dishes
While peppermint creams are delightful on their own, pairing them with a cup of hot cocoa or a steaming mug of peppermint tea creates an enticing flavor harmony. They also make a festive finish to holiday cookie platters or an elegant accompaniment to a cheese board with rich figs and nuts.
Creative Ways to Present
Presentation can elevate the experience, so think about arranging your peppermint creams layered in a beautiful glass jar tied with ribbon or nestled in decorative candy cups. You could also wrap them individually in parchment paper for charming homemade gifts that friends and family will adore.
Make Ahead and Storage
Storing Leftovers
Store your peppermint creams in an airtight container at room temperature, ideally in a cool, dry place to keep them from becoming sticky or too hard. They will maintain their perfect texture and flavor for up to two weeks, making them a lovely make-ahead treat.
Freezing
If you want to keep your creams even longer, freezing is a great option. Wrap them tightly in parchment paper and place them in a freezer-safe container. When ready to enjoy, allow them to return to room temperature gradually to prevent condensation from affecting their texture.
Reheating
Since peppermint creams are a no-bake treat, reheating isn’t necessary. However, if you’ve dipped them in chocolate and it’s hardened too much, a brief warm setting in a low-temperature oven can help soften them gently. Just be careful to avoid melting the candy underneath.
FAQs
Can I use fresh peppermint instead of peppermint extract?
Fresh peppermint leaves have a milder and different flavor profile compared to peppermint extract, which is more concentrated. Using fresh leaves won’t provide the strong mint flavor that defines peppermint creams, so it’s best to stick with the extract for an authentic taste.
What is the purpose of lemon juice in this recipe?
Lemon juice acts as the binding agent that turns the icing sugar into a moldable mixture and also adds a zesty brightness that contrasts beautifully with the sweetness and mintiness. It’s key in balancing flavor and achieving the right texture.
Can I make these peppermint creams without the dark chocolate?
Absolutely! The dark chocolate is optional but highly recommended if you want to add richness and texture contrast. The peppermint creams are delicious, even without it—pure, classic, minty sweets at their finest.
How long do peppermint creams last?
If stored properly in an airtight container, your homemade peppermint creams will stay fresh and tasty for around two weeks. Just keep them away from heat and moisture to maintain their perfect consistency.
Can I shape the dough by hand instead of cutting with cookie cutters?
Yes! If you prefer, you can roll small balls or shape the creams by hand. Cookie cutters add a fun decorative touch, but handmade shapes can make each piece feel even more special and customized.
Final Thoughts
Making this Easy Peppermint Creams Recipe is truly a joyous experience that brings together simple ingredients with fantastic results. Whether you’re gifting them to someone special or savoring them yourself, these lovably smooth and minty treats never fail to put a smile on your face. Give the recipe a go—your home will smell heavenly, and your taste buds will thank you!
Print
Easy Peppermint Creams Recipe
- Prep Time: 30 minutes
- Cook Time: 0 minutes
- Total Time: 30 minutes
- Yield: 20 pieces
- Category: Confectionery
- Method: No-Cook
- Cuisine: British
Description
These Easy Peppermint Creams are a delightful no-cook treat, combining the sweet tang of lemon juice with refreshing peppermint extract for a classic holiday flavor. Rolled out and cut into festive shapes, they make perfect homemade candies or decorations. Optional dark chocolate adds a rich touch, while edible glitter or icing decorations bring a festive sparkle.
Ingredients
Base Ingredients
- 425 g icing sugar
- 50 ml lemon juice
- ½ tsp peppermint extract
Optional Toppings
- 50 g dark chocolate (optional but, frankly, pretty essential!)
- Edible glitter, icing shapes, or golden sugar (optional)
Instructions
- Sift the icing sugar: Sieve the icing sugar to remove any lumps, ensuring a smooth base for your peppermint creams.
- Mix in lemon juice: Gradually add the lemon juice, stirring continuously until the mixture becomes crumbly but not sticky. This develops the perfect texture for forming.
- Add peppermint extract: Drop in the peppermint extract and thoroughly combine to infuse the mixture with a refreshing mint flavor.
- Knead the mixture: Using your hands, knead the mixture until it becomes smooth and forms a cohesive ball. Adjust texture by adding a little more lemon juice if too dry or more icing sugar if too sticky, avoiding a sticky mess.
- Roll out the dough: Lightly dust your work surface and rolling pin with icing sugar, then roll the dough to about 5mm thickness, ready for shaping.
- Cut into shapes: Using cookie cutters, cut the dough into festive shapes such as hearts, snowflakes, and stars for a charming presentation.
- Dry the shapes: Arrange the cut shapes on baking parchment and leave them to dry for at least 30 minutes until firm to the touch.
Notes
- You can decorate your peppermint creams with edible glitter, icing shapes, or golden sugar for an extra festive look.
- Melting and drizzling the optional dark chocolate over the creams adds a delicious contrast in flavor and texture.
- Handle the dough gently; avoid adding too much lemon juice to prevent stickiness.
- Store peppermint creams in an airtight container at room temperature to keep them fresh.


