
If you have a soft spot for cookies that strike the perfect balance between buttery richness and fruity brightness, then you’re going to adore this Raspberry Jam Thumbprint Cookies Recipe. These charming little treats boast a tender, melt-in-your-mouth base infused with the delicate tartness of freeze-dried raspberry powder, complemented by a luscious dollop of sweet raspberry jam nestled right in their heart-shaped indentation. Whether you’re baking for a cozy afternoon tea or a festive holiday gathering, this recipe is pure joy, straightforward to whip up, and so irresistibly good you’ll find yourself coming back for just one more.
Ingredients You’ll Need
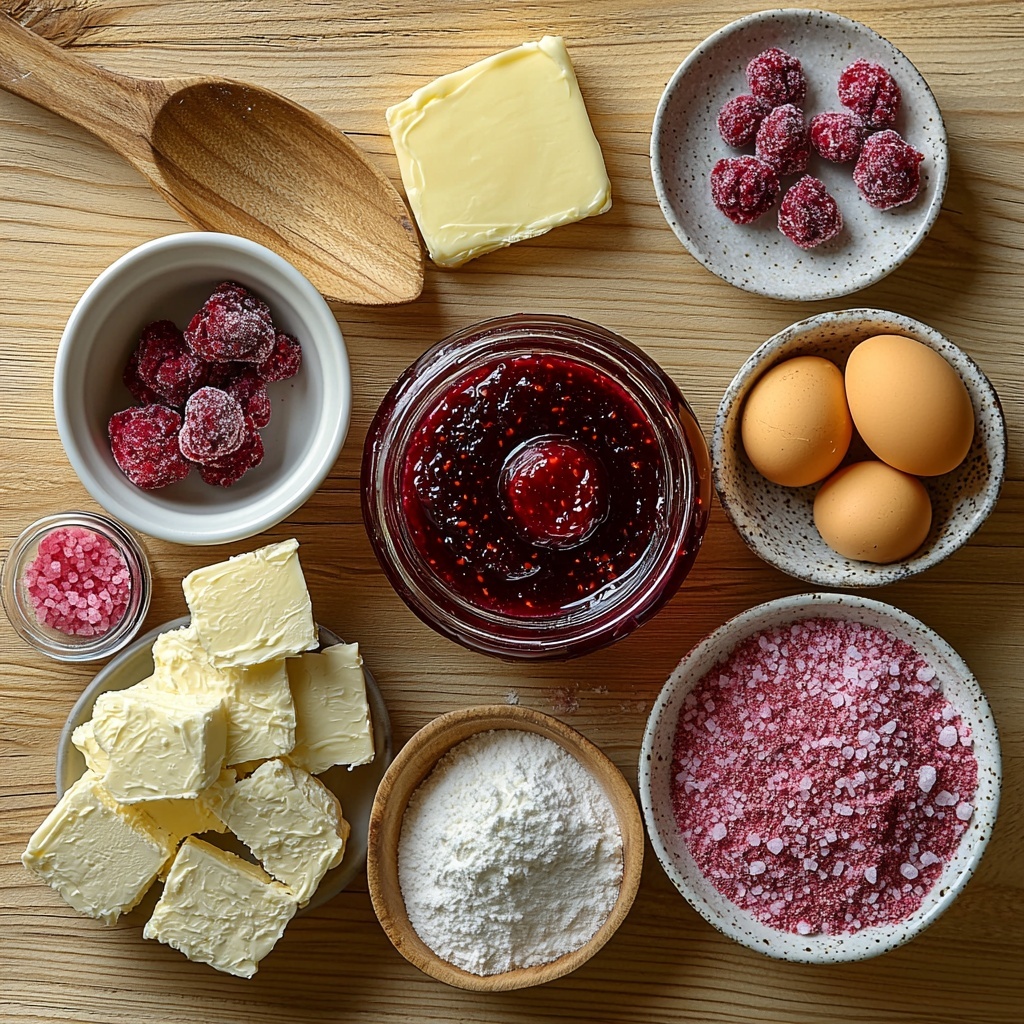
One of the best parts about the Raspberry Jam Thumbprint Cookies Recipe is that it uses simple, pantry-friendly ingredients that play such a vital role in creating flavor, texture, and that gorgeous rosy hue. Each component adds its own magic—soft butter for richness, freeze-dried raspberry powder for a natural tang and color, and a good-quality raspberry jam that bursts with sweetness right where it counts.
- Unsalted butter, 1 cup: Softened to room temperature, it provides a creamy, tender crumb essential for the perfect cookie texture.
- Granulated sugar, ⅔ cup: Sweetens the dough while helping to create a light, fluffy base when creamed with butter.
- Egg yolks, 2: They add moisture and help bind the ingredients for that buttery richness.
- Vanilla extract, 1 teaspoon: A classic flavor enhancer that deepens the cookie’s overall aroma and taste.
- All-purpose flour, 2 ¼ cups (280g): The foundation of the cookie, giving structure without weighing it down.
- Kosher salt, ¼ teaspoon: Balances the sweetness and enhances all the other flavors.
- Freeze-dried raspberry powder, 4 tablespoons: Adds a subtle, natural raspberry flavor and beautiful pink color without any extra moisture.
- Raspberry jam, 10 oz: The crowning jewel that fills the thumbprint indentation with sweet, fruity goodness.
How to Make Raspberry Jam Thumbprint Cookies Recipe
Step 1: Cream Butter and Sugar
Start by whipping the softened butter and granulated sugar together in a large bowl until the mixture is light and fluffy—about 3 minutes with an electric mixer. This aeration is crucial for tender, melt-in-your-mouth cookies that will gently hold their shape.
Step 2: Add Egg Yolks and Vanilla
Next, add the egg yolks and vanilla extract to the creamed mixture. Keep mixing until smooth and combined. The egg yolks enrich the dough, while the vanilla lends a warm, inviting scent that hints at the deliciousness to come.
Step 3: Whisk Dry Ingredients Separately
In a separate bowl, whisk together the flour, kosher salt, and freeze-dried raspberry powder. The raspberry powder not only infuses the dough with a subtle berry essence but also imparts a pretty pink tint that makes these cookies visually irresistible.
Step 4: Combine Wet and Dry Ingredients
Add the dry ingredients in two batches to the wet mixture, mixing until just combined. Avoid overmixing to keep the cookies tender and ensure a soft crumb once baked.
Step 5: Chill the Dough
Cover your dough bowl and pop it into the refrigerator for 30 minutes. This chill time firms up the dough, preventing excessive spreading during baking and intensifying the flavors throughout.
Step 6: Preheat and Prepare Baking Sheets
Set your oven to 350˚F and line two baking sheets with parchment paper. The parchment prevents sticking and promotes even browning on the cookie bottoms.
Step 7: Shape the Cookies
Using a tablespoon, scoop out dough and roll it into balls with your hands before flattening each ball slightly into a puck shape. This uniformity helps the cookies bake evenly and look consistent.
Step 8: Create Thumbprints with a Heart Shape
Place each dough ball on the baking sheet, then gently press your pinky or index finger down into the center to form a heart-shaped indentation, pressing about three-quarters down through the dough ball. The shape adds charming character and the perfect cavity for the jam.
Step 9: Fill with Raspberry Jam
Spoon or pipe the raspberry jam into each heart-shaped indentation, filling almost to the top. This juicy center will bubble slightly as the cookies bake, creating a glossy, fruity focal point.
Step 10: Chill Again Before Baking
Return the cookies to the refrigerator for another 10-15 minutes. This extra chill helps the cookies hold their shape and prevents the jam from melting too quickly in the oven.
Step 11: Bake Until Golden
Bake for 10-12 minutes until the bottoms are browned. The tops may still feel soft, but don’t worry—they will set as the cookies cool, leaving you with a tender, buttery texture.
Step 12: Cool Completely
Transfer the cookies to a cooling rack and let them cool fully. This step is crucial for the jam centers to firm up slightly and for you to enjoy the full, luscious flavor of each bite.
How to Serve Raspberry Jam Thumbprint Cookies Recipe
Garnishes
Once your Raspberry Jam Thumbprint Cookies Recipe goodies have cooled, consider a light dusting of powdered sugar for a delicate snowy effect—especially pretty for holiday occasions. A tiny fresh raspberry or mint leaf on top of each jam heart can add a fresh pop of color and elegance too.
Side Dishes
These cookies pair wonderfully with a cup of afternoon tea or a frothy cappuccino, as the fruity sweetness complements the bitter notes in the drinks. For a festive twist, serve alongside a bowl of fresh berries or whipped cream for dipping that adds a delightful contrast.
Creative Ways to Present
For a gift or party platter, arrange the cookies on a colorful serving tray lined with parchment or doilies. Stack them in small towers for a charming look, or place each cookie in its own decorative mini cupcake liner to keep things neat and tidy. They’re as beautiful as they are delicious!
Make Ahead and Storage
Storing Leftovers
You can store any leftover Raspberry Jam Thumbprint Cookies Recipe goodies in an airtight container at room temperature for up to 4 days without losing their signature tenderness or jam freshness. Make sure the container is well sealed to keep moisture out and preserve the buttery texture.
Freezing
If you want to prepare these cookies in advance, freeze the baked and fully cooled cookies in a single layer on a baking sheet first. Once frozen, transfer them to a freezer-safe bag or container. When stored this way, they’ll keep their freshness for up to 3 months. Thaw at room temperature before serving.
Reheating
To enjoy your cookies warm and freshly baked, pop them into a preheated 300˚F oven for 5 minutes. This gentle reheating melts the jam slightly and softens the cookie without making it dry, reviving that just-baked charm.
FAQs
Can I substitute fresh raspberries for the freeze-dried raspberry powder?
Fresh raspberries have too much moisture and will disrupt the dough consistency. Freeze-dried raspberry powder is the best choice as it adds intense flavor without extra liquid.
Is it necessary to chill the dough twice?
Yes! The first chill firms up the dough for easier handling, and the second chill helps the cookies keep their shape while baking to prevent spreading and preserve those cute heart indentations.
Can I use a different type of jam?
Absolutely! While raspberry jam is classic here, feel free to experiment with strawberry, apricot, or even a mixed berry jam. Just keep in mind that thicker jams work best so they don’t run during baking.
How do I make the heart-shaped indentation properly?
Use your pinky or index finger to press down gently but firmly about three-quarters through the dough ball. This creates a deep enough well for the jam without breaking through the cookie’s bottom.
Will using salted butter affect the recipe?
Since this recipe calls for kosher salt, using salted butter may make the cookies too salty. To avoid this, either reduce or omit the extra salt in the recipe when using salted butter.
Final Thoughts
Baking the Raspberry Jam Thumbprint Cookies Recipe is truly a joyful experience that will fill your kitchen with irresistible aromas and your heart with delight. These cookies are a beautiful combination of simple ingredients transformed into something special that’s perfect for sharing or savoring all on your own. I wholeheartedly encourage you to grab your mixing bowl and try this recipe—you’ll soon discover why it’s such a beloved classic that never goes out of style.
Print
Raspberry Jam Thumbprint Cookies Recipe
- Prep Time: 15 minutes
- Cook Time: 12 minutes
- Total Time: 1 hour
- Yield: 24 servings
- Category: Baking
- Method: Baking
- Cuisine: American
Description
These Raspberry Jam Thumbprint Cookies are a delightful treat combining buttery, tender cookies with a burst of raspberry jam in the center. Infused with freeze-dried raspberry powder for extra natural flavor and a lovely pink hue, these cookies make an elegant and tasty snack perfect for any occasion.
Ingredients
Cookie Dough
- 1 cup unsalted butter, softened to room temperature
- ⅔ cup granulated sugar
- 2 egg yolks
- 1 teaspoon vanilla extract
- 2 ¼ cups (280g) all-purpose flour
- ¼ teaspoon kosher salt
- 4 tablespoons freeze dried raspberry powder, sifted (~1 bag of freeze dried raspberries)
Filling
- 10 oz raspberry jam
Instructions
- Cream the Butter and Sugar: In a large bowl, use an electric mixer to cream together the unsalted butter and granulated sugar until the mixture becomes light and fluffy, which should take about 3 minutes.
- Add Egg Yolks and Vanilla: Mix in the egg yolks and vanilla extract until the mixture is smooth and well combined.
- Combine Dry Ingredients: In a separate bowl, whisk together the all-purpose flour, kosher salt, and sifted freeze-dried raspberry powder to evenly distribute the ingredients.
- Mix Dry Ingredients into Wet: Add the dry ingredient mixture to the wet ingredients in two batches, mixing just until incorporated to avoid overworking the dough.
- Chill the Dough: Cover the bowl with plastic wrap and refrigerate the dough for 30 minutes to firm up and make it easier to handle.
- Prepare Baking Sheets and Oven: Preheat your oven to 350°F (175°C) and line two baking sheets with parchment paper to prevent sticking.
- Shape the Cookies: Scoop tablespoons of dough and roll each into a ball, then flatten slightly into a puck shape with your hands.
- Create the Thumbprint Indentation: Place each dough ball on the lined baking sheet and use your pinky or index finger to press an indentation about three-quarters of the way through, forming a heart shape if desired.
- Fill with Raspberry Jam: Spoon or pipe the raspberry jam into each indentation, filling nearly to the top without overflowing.
- Chill Before Baking: Return the cookie trays to the refrigerator for another 10-15 minutes to help the cookies hold their shape when baking.
- Bake the Cookies: Bake in the preheated oven for 10-12 minutes until the bottoms are browned. The tops may feel soft but will set as they cool.
- Cool Completely: Transfer the cookies to a cooling rack and let them cool entirely to allow the jam to set and cookies to firm up.
Notes
- Chilling the dough before and after shaping helps maintain the cookie’s shape and prevents spreading during baking.
- Using freeze-dried raspberry powder intensifies the raspberry flavor without adding moisture to the dough.
- When forming the thumbprints, pressing about three-quarters deep creates the perfect indentation for the jam to hold without overflowing.
- If raspberry jam is too runny, consider heating it slightly to reduce moisture or use a thicker jam for a better hold.
- Store cookies in an airtight container at room temperature for up to 5 days or freeze for longer storage.


