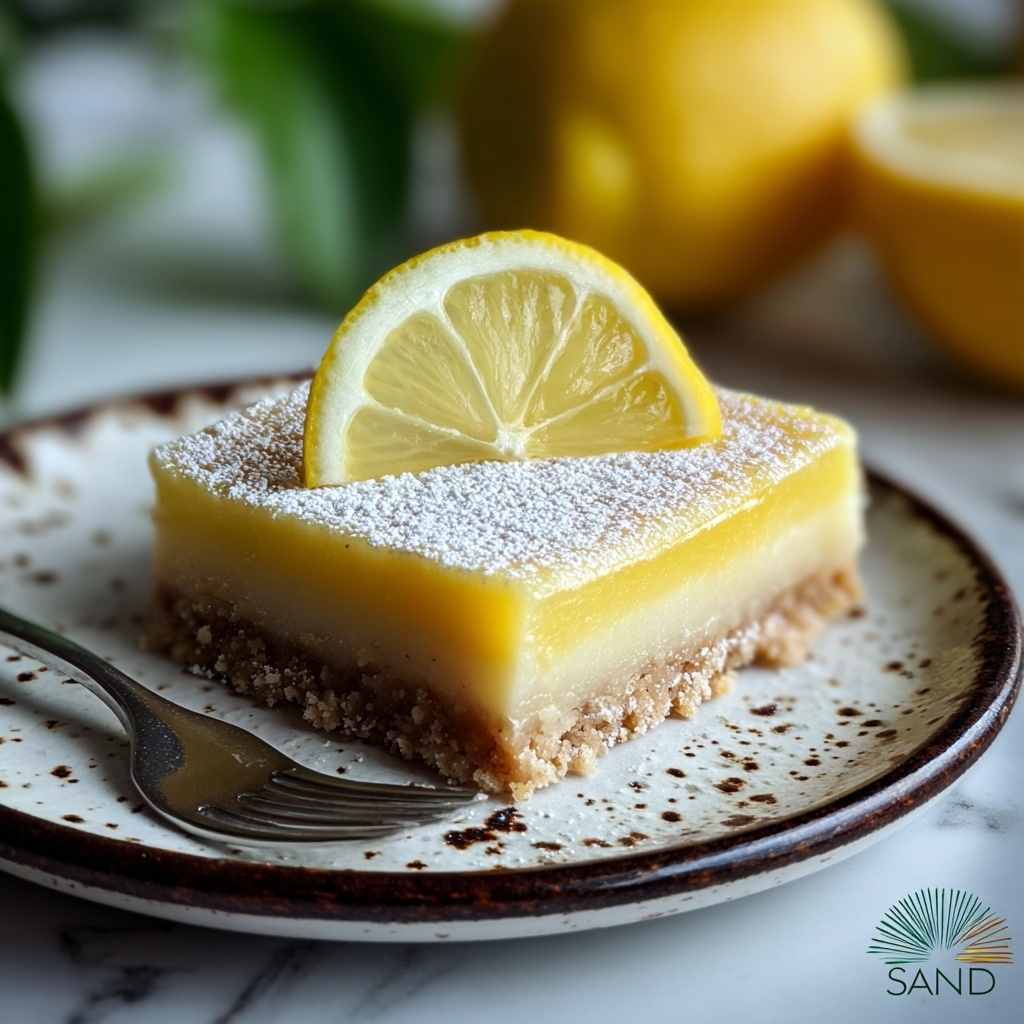
If you’ve been dreaming of the perfect balance between tart and sweet in a dessert, you are going to adore this Lemon Bars Recipe. It’s a classic treat that combines a buttery, tender crust with a zesty, melt-in-your-mouth lemon filling. Every bite bursts with lively brightness, making it a refreshing yet comforting indulgence. Whether you’re serving this at a family gathering or just craving a little sunshine in your dessert bowl, these luscious lemon bars never fail to please and bring smiles all around.
Ingredients You’ll Need
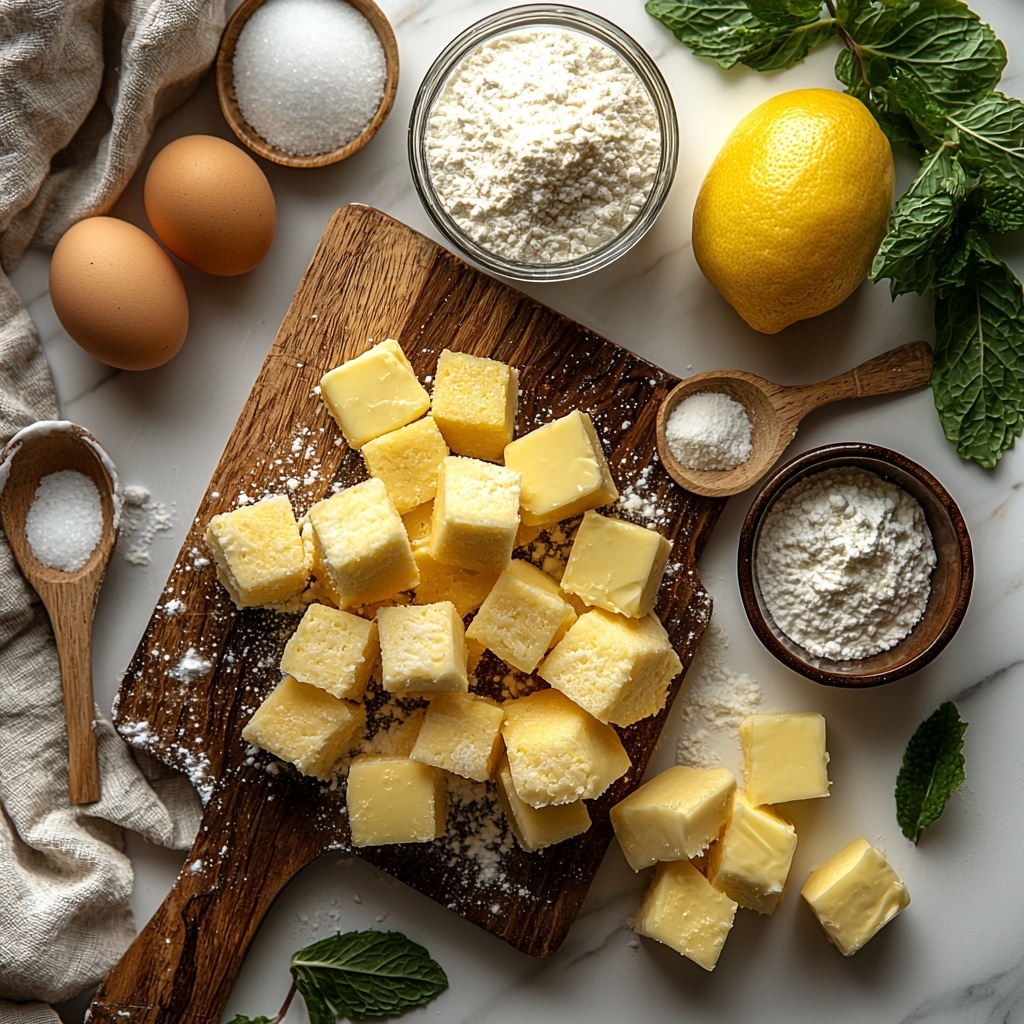
This Lemon Bars Recipe calls for simple, straightforward ingredients that come together to create layers of flavor and texture. Each element has a job to do—whether it’s that flaky crust or the vibrant lemon filling, these essentials guarantee a delicious result every time.
- 1 cup all-purpose flour: Provides the sturdy yet tender base for the buttery crust that holds everything together.
- 1/2 cup granulated sugar (for crust): Adds just enough sweetness to complement the tangy lemon while keeping the crust crisp.
- 1/2 cup unsalted butter, softened: The key to that rich, melt-in-your-mouth crust that’s slightly golden and perfectly flaky.
- 1 cup granulated sugar (for filling): Sweetens the tart lemon filling without overpowering the fresh citrus punch.
- 4 large fresh eggs: Bind the lemon filling to that crust, giving it a silky, custardy texture.
- 1/2 cup fresh lemon juice (about 2-3 lemons): Delivers the bright, zesty flavor that makes these bars irresistible.
- Zest of 1 lemon: For an extra lemony aroma and a subtle burst of citrus oils in every bite.
- 1 teaspoon baking powder: Helps the filling set with just the right lightness and a slight jiggle.
- Pinch of salt: Balances the sweetness and enhances all the flavors.
- Powdered sugar for dusting (optional): Adds a pretty, delicate finish and a hint of extra sweetness on top.
How to Make Lemon Bars Recipe
Step 1: Prepare the Crust
Start by preheating your oven to 350°F (175°C) and lining an 8×8 inch baking pan with parchment paper. Combining the flour, sugar, and softened butter in a bowl, mix until you achieve a crumbly texture. Then press this mixture firmly into the bottom of your prepared pan. This step is crucial because it creates the sturdy, buttery base that will perfectly support the vibrant lemon filling. Bake the crust for about 15 minutes or until it turns a lovely light golden shade.
Step 2: Whisk the Filling
While the crust is baking, grab another bowl to whisk together the eggs, remaining sugar, fresh lemon juice, lemon zest, baking powder, and a pinch of salt. The combination of these ingredients turns into a smooth, bright filling bursting with citrus flavor. Whisking until completely smooth ensures that your filling will set beautifully and have a silky texture once baked.
Step 3: Bake the Lemon Filling
Once the crust comes out of the oven, pour the lemon mixture evenly over the warm crust. Return the pan to the oven and bake for an additional 20 to 25 minutes. You’ll want to watch for the filling to be set but still have a slight jiggle in the center — this means it’s perfectly custardy and not overbaked. Letting it cool completely is essential to allow the filling to firm up and make slicing easier.
Step 4: Finishing Touches
After your lemon bars have cooled, dust them lightly with powdered sugar if you like that little extra touch of sweetness and a pretty finish. Then cut them into squares, and get ready to enjoy the wonderful marriage of tart, sweet, buttery goodness in every bite.
How to Serve Lemon Bars Recipe
Garnishes
To elevate your Lemon Bars Recipe with a little extra flair, consider garnishing with fresh lemon slices, a sprinkle of finely chopped mint, or a dusting of powdered sugar. These simple touches add visual appeal and subtly enhance the fresh citrus experience without overwhelming the classic flavors.
Side Dishes
Lemon bars shine on their own as a bright, refreshing dessert, but pairing them with a light scoop of vanilla ice cream or a dollop of whipped cream can create a delightful contrast of temperatures and textures. A cup of hot herbal tea or freshly brewed coffee can also perfectly complement the zesty sweetness, making your serving experience even more special.
Creative Ways to Present
Get a little creative with your Lemon Bars Recipe presentation by serving the bars on elegant trays dusted with powdered sugar, or stacking them in layers tied with a pretty ribbon if gifting. For casual gatherings, set up a dessert bar with assorted fresh berries alongside to add bursts of color and flavor next to your lemon treats.
Make Ahead and Storage
Storing Leftovers
After enjoying your fresh lemon bars, store any leftovers in an airtight container in the refrigerator. They’ll stay fresh and flavorful for up to 4 days. Chilling them helps maintain the structural integrity of the lemon filling while keeping the crust crisp and buttery.
Freezing
If you want to keep your Lemon Bars Recipe on hand for longer, freezing works wonderfully. Wrap individual bars tightly in plastic wrap and then place them in a freezer-safe container or bag. They can be frozen for up to 2 months. When you’re ready to indulge, just thaw them overnight in the refrigerator for the best texture.
Reheating
Reheating lemon bars isn’t always necessary, but if you prefer them warm, pop them back into a preheated 300°F (150°C) oven for about 10 minutes. This will gently warm the filling without drying it out or compromising the crust’s buttery texture. Avoid microwaving as it can make them soggy.
FAQs
Can I use bottled lemon juice instead of fresh lemon juice?
While fresh lemon juice is always preferred for the brightness and natural flavor it offers, bottled lemon juice can be used in a pinch. Just make sure it’s 100% lemon juice with no added sugars or preservatives to keep the perfect balance in your Lemon Bars Recipe.
What if I don’t have parchment paper for lining the pan?
If you don’t have parchment paper, you can grease your baking pan generously with butter to prevent sticking. However, parchment paper makes cleanup easier and helps remove the bars quickly and cleanly, so it’s worth having on hand.
Why is my lemon filling not setting properly?
The most common cause is underbaking or incorrect oven temperature. Make sure your oven is fully preheated before baking, and bake the lemon filling until it’s mostly set with just a slight jiggle in the center. Overmixing can also affect texture, so mix until smooth but not excessively.
Can I make these lemon bars gluten-free?
Absolutely! You can substitute the all-purpose flour with a gluten-free flour blend that measures cup-for-cup. Keep in mind that the texture may be slightly different, but the tart lemon flavor will still shine. Just be sure the blend you use contains binding agents for best results.
How long do lemon bars last at room temperature?
Because these bars contain eggs and fresh lemon juice, it’s best to refrigerate them. At room temperature, they should only be left out for about 2 hours to ensure food safety and maintain freshness. Refrigeration is your best bet to keep the Lemon Bars Recipe tasting fresh and safe.
Final Thoughts
I hope this Lemon Bars Recipe brings you as much joy and satisfaction as it has brought me over the years. It’s a beautifully simple yet deeply flavorful treat that never fails to brighten up any day. Whether you’re making it for a special occasion or just because, these lemon bars are sure to become a favorite in your dessert rotation. Go ahead, give this recipe a try, and let those vibrant, buttery flavors put a smile on your face!
Print
Lemon Bars Recipe
- Prep Time: 15 minutes
- Cook Time: 40 minutes
- Total Time: 55 minutes
- Yield: 9 servings
- Category: Dessert
- Method: Baking
- Cuisine: American
Description
These classic Lemon Bars feature a buttery, crumbly crust topped with a tangy, smooth lemon filling. Perfectly balanced between sweet and tart, they make a delightful dessert or snack with a fresh citrus punch.
Ingredients
For the Crust
- 1 cup all-purpose flour
- 1/2 cup granulated sugar
- 1/2 cup unsalted butter, softened
For the Filling
- 1 cup granulated sugar
- 4 large fresh eggs
- 1/2 cup fresh lemon juice (about 2–3 lemons)
- Zest of 1 lemon
- 1 teaspoon baking powder
- Pinch of salt
Optional
- Powdered sugar for dusting
Instructions
- Preheat Oven: Preheat your oven to 350°F (175°C) and line an 8×8 inch baking pan with parchment paper to ensure easy removal of the lemon bars after baking.
- Prepare Crust Mixture: In a mixing bowl, combine the all-purpose flour, 1/2 cup granulated sugar, and softened unsalted butter. Mix these ingredients until the mixture becomes crumbly and evenly combined.
- Form and Bake Crust: Firmly press the crumbly dough into the bottom of the prepared baking pan to create an even crust layer. Bake this crust in the preheated oven for about 15 minutes or until it turns lightly golden.
- Mix Lemon Filling: While the crust is baking, whisk together in another bowl the eggs, remaining 1 cup granulated sugar, fresh lemon juice, lemon zest, baking powder, and a pinch of salt until the mixture is smooth and well combined.
- Pour Filling Over Crust: Remove the crust from the oven and immediately pour the prepared lemon filling over the warm crust to ensure good bonding between crust and filling.
- Bake Lemon Bars: Return the baking pan to the oven and bake for an additional 20-25 minutes. The filling should be set but slightly jiggly in the center when done.
- Cool and Serve: Allow the lemon bars to cool completely in the pan to set fully before cutting into squares. Optionally, dust the top with powdered sugar for an elegant finish.
Notes
- If you prefer a more tart flavor, increase the lemon juice slightly.
- Line the pan with parchment paper extending over the edges to easily lift out the bars.
- Ensure the butter is softened but not melted to achieve the perfect crumbly crust texture.
- Let the bars cool completely before slicing to prevent the filling from cracking.
- Store in an airtight container in the refrigerator for up to 4 days.


