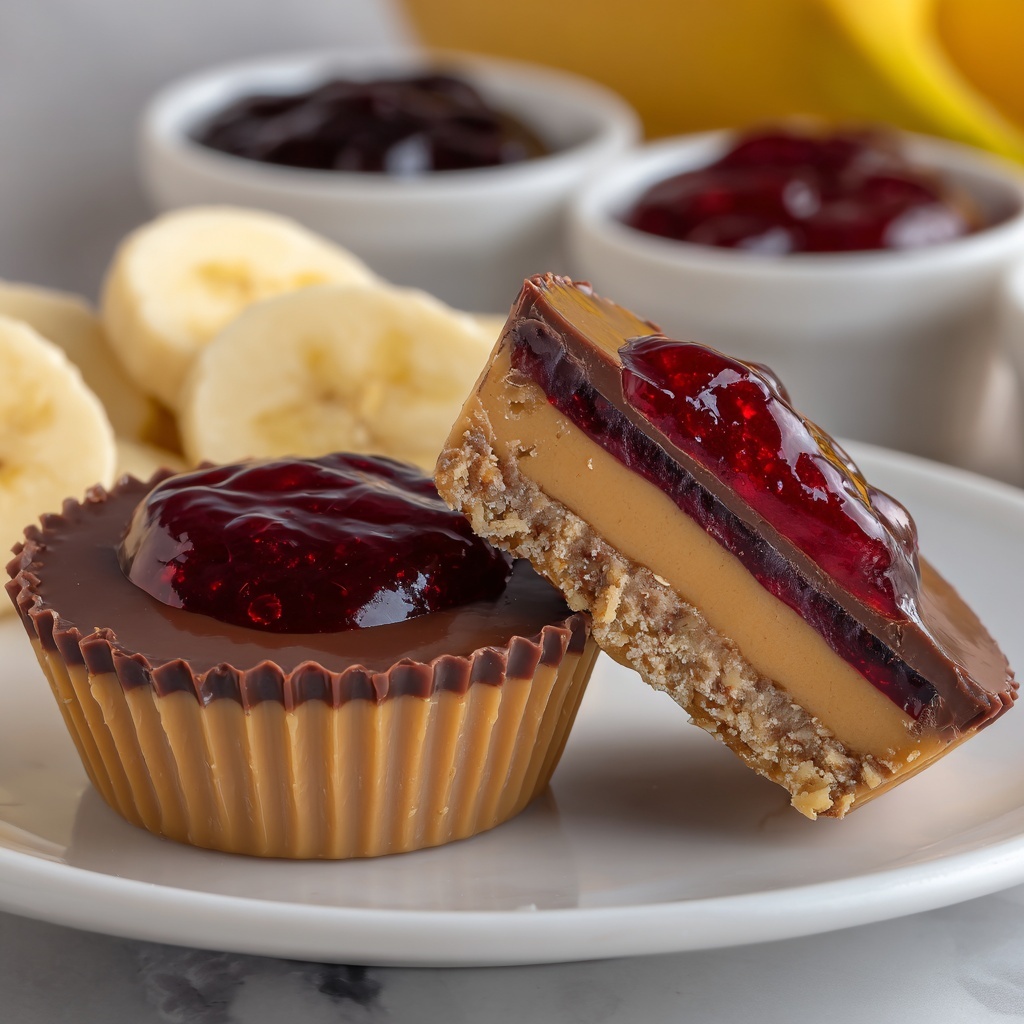
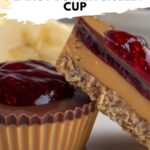
If you adore the classic combination of peanut butter and jelly, then you’re going to fall head over heels for this Peanut Butter & Jelly Cups Recipe. Imagine rich, creamy peanut butter layered with your favorite fruity jelly, all encased in a glossy chocolate shell that gives each bite a satisfying snap. These little cups are the perfect sweet treat for when you want something indulgent but easy to make at home. Whether for a snack, dessert, or a fun party share, this recipe brings together nostalgia and sophistication in every mouthful.
Ingredients You’ll Need
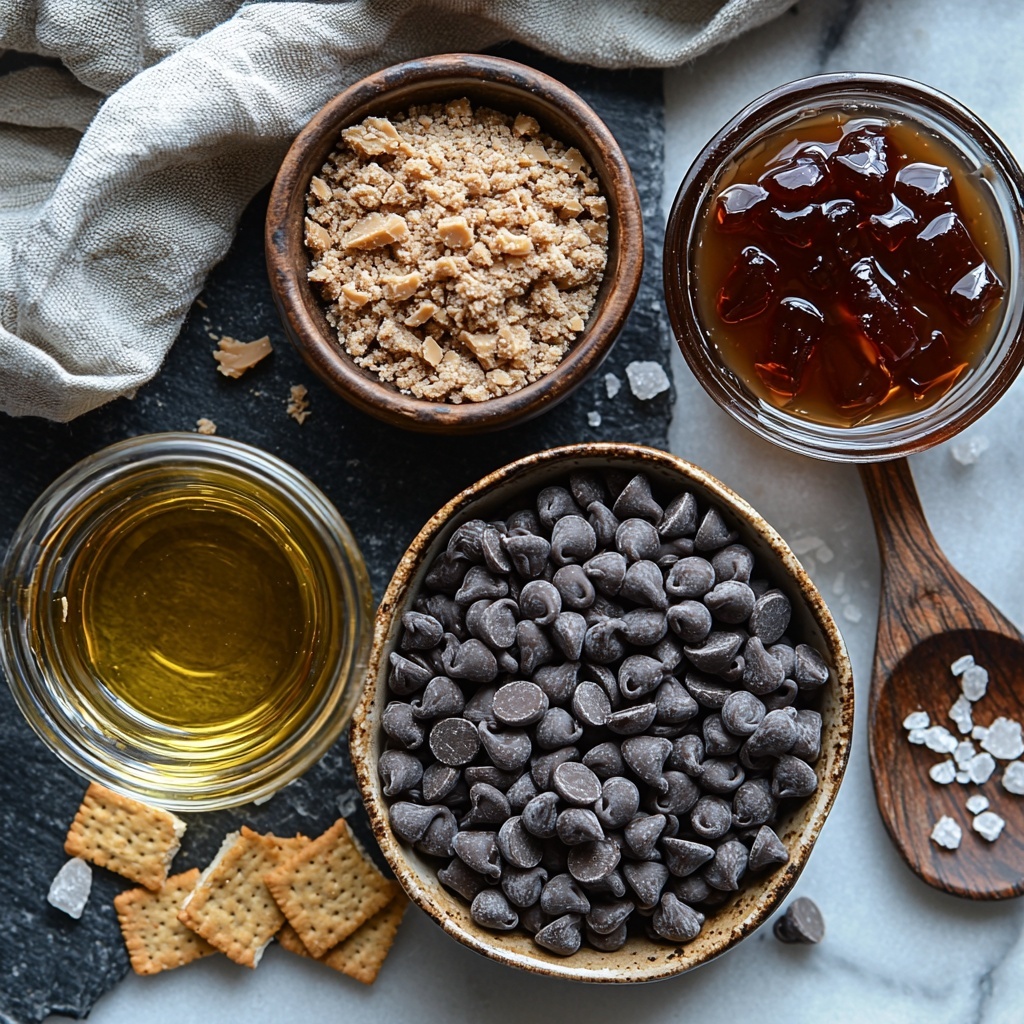
The beauty of this Peanut Butter & Jelly Cups Recipe lies in its simplicity, with each ingredient playing a key role in creating the perfect balance of flavor and texture. From smooth peanut butter to luscious jelly and silky chocolate, every element is essential.
- 1 cup semi-sweet chocolate chips: Provides a rich, melty coating that hardens into a satisfying shell.
- 1 tablespoon coconut oil: Optional, but adds smoothness and shine to the melted chocolate.
- 1 cup creamy peanut butter: The star of the filling, creamy and flavorful for a luscious mouthfeel.
- 1/2 cup powdered sugar: Adds just the right touch of sweetness to balance the peanut butter.
- 1/4 cup graham cracker crumbs: Introduces a pleasant crunch and subtle nutty flavor.
- 1/2 teaspoon vanilla extract: Enhances the overall sweetness with warm, aromatic notes.
- Pinch of salt: Amplifies the flavors, making everything taste even better.
- 1/2 cup jelly or jam: Your favorite flavor (strawberry, grape, raspberry, etc.) adds that classic fruity touch.
How to Make Peanut Butter & Jelly Cups Recipe
Step 1: Melt the Chocolate
Start by melting the chocolate chips along with the optional coconut oil in a microwave-safe bowl. Use 30-second intervals, stirring well in between, until the chocolate is silky smooth. The coconut oil helps give the chocolate a lovely glossy finish and makes it easier to coat the cups.
Step 2: Prepare the Muffin Tin
Line a muffin tin with paper liners or silicone cups. These will keep your peanut butter and jelly cups perfectly shaped and make removal a breeze once they’re set.
Step 3: Add Chocolate to Liners
Drop a spoonful of the melted chocolate into the bottom of each liner. Spread it slightly up the sides to create a nice shell that will hold all the delicious fillings. This chocolate layer is your base and adds that delightful snap.
Step 4: Chill the Chocolate Layer
Pop the muffin tin into the refrigerator for 10 to 15 minutes so the chocolate can firm up. This helps keep the layers distinct and prevents the fillings from mixing together early.
Step 5: Mix the Peanut Butter Filling
Combine the creamy peanut butter, powdered sugar, graham cracker crumbs, vanilla extract, and a pinch of salt in a medium bowl. Stir everything until the mixture is perfectly smooth and comes together with a hint of sweetness and just a touch of crunch.
Step 6: Add Peanut Butter Filling to Cups
Take the muffin tin out of the fridge and carefully spoon the peanut butter mixture into each chocolate-lined cup. Fill each about three-quarters full so there’s room for the next two layers.
Step 7: Add the Jelly Layer
Now, add a spoonful of your favorite jelly or jam on top of the peanut butter. Creating a little well in the center can keep the jelly from spilling over when you add the final chocolate layer.
Step 8: Top with Chocolate
Gently pour the remaining melted chocolate over the jelly, covering each cup so the jelly is sealed inside. Give the muffin tin a gentle tap on the counter to settle everything nice and evenly.
Step 9: Chill Until Set
Return the muffin tin to the refrigerator for 15 to 20 minutes, allowing the chocolate to harden fully. This chilling step ensures your Peanut Butter & Jelly Cups Recipe come out firm, neat, and bursting with flavor.
Step 10: Remove Cups and Enjoy
Once set, carefully peel off the liners and lift out your peanut butter and jelly cups. These treats are ready to be enjoyed immediately or stored for later indulgence.
How to Serve Peanut Butter & Jelly Cups Recipe
Garnishes
Consider a sprinkle of crushed peanuts or a drizzle of extra melted chocolate on top just before serving to add a bit of flair and textural contrast. Fresh berries on the side also make for a lovely, colorful complement.
Side Dishes
Pair these cups with a cold glass of milk or a hot cup of coffee for the ultimate satisfying snack. They also work wonderfully alongside simple vanilla or chocolate ice cream to create a little dessert platter everyone will love.
Creative Ways to Present
For a party or get-together, arrange these cups on a decorative serving tray lined with fresh mint leaves or edible flowers. You can also pop them into mini cupcake liners for an added touch of whimsy that makes them seem even more special.
Make Ahead and Storage
Storing Leftovers
The Peanut Butter & Jelly Cups Recipe keeps best in an airtight container in the refrigerator for up to one week. This helps maintain the chocolate’s crispness and keeps the filling fresh and tasty.
Freezing
Want to save these for later? Freeze the cups in a single layer on a baking sheet first, then transfer to a freezer-safe container or bag. They can be frozen for up to 3 months and make a perfect quick thaw-and-serve treat.
Reheating
Because these treat cups are best served cool, simply bring them to room temperature for about 10 minutes before serving. Avoid microwaving as it may melt the chocolate and affect the texture.
FAQs
Can I use crunchy peanut butter instead of creamy?
Absolutely! Crunchy peanut butter will add extra texture to the filling, which some people love. Just be sure to mix it well with the powdered sugar and graham cracker crumbs to keep the texture balanced.
What kind of jelly or jam works best in this recipe?
Any flavor you love will work wonderfully, whether it’s classic strawberry, rich grape, or tart raspberry. Feel free to experiment with unusual flavors like apricot or blackberry for a unique twist.
Is it necessary to add coconut oil to the chocolate?
Not at all! Coconut oil is optional but helps achieve a smoother, shinier finish and makes the melted chocolate easier to work with. If you prefer, you can melt the chocolate chips on their own just fine.
Can I make these cups nut-free?
Since peanut butter is the star here, making this exact recipe nut-free is tricky. You could try a sunflower seed butter or soy-based butter substitute, but the flavor and texture will be different.
How long do these cups last at room temperature?
Because of the peanut butter filling, it’s best to keep these refrigerated. At room temperature, they may soften and the chocolate may lose its snap after a couple of hours, especially in warmer climates.
Final Thoughts
There’s something wonderfully comforting about the childhood favorite of peanut butter and jelly transformed into these elegant, bite-sized cups. This Peanut Butter & Jelly Cups Recipe is easy to make, delightfully tasty, and perfect for any occasion that calls for a little nostalgic indulgence. I can’t wait for you to try it and share it with your friends and family—these cups really do bring smiles with every bite!
Print
Peanut Butter & Jelly Cups Recipe
- Prep Time: 15 minutes
- Cook Time: 30 minutes
- Total Time: 45 minutes
- Yield: 12 cups
- Category: Dessert
- Method: No-Cook
- Cuisine: American
- Diet: Vegetarian
Description
Delicious homemade Peanut Butter & Jelly Cups featuring a rich chocolate shell filled with creamy peanut butter and a sweet jelly layer. These no-bake treats combine classic flavors in a convenient bite-sized form, perfect for snacking or dessert.
Ingredients
Chocolate Shell
- 1 cup semi-sweet chocolate chips or dark chocolate chips
- 1 tablespoon coconut oil (optional, for a smoother consistency)
Peanut Butter Filling
- 1 cup creamy peanut butter (natural or regular)
- 1/2 cup powdered sugar
- 1/4 cup graham cracker crumbs
- 1/2 teaspoon vanilla extract
- Pinch of salt
Jelly Layer
- 1/2 cup jelly or jam (strawberry, grape, raspberry, etc.)
Instructions
- Melt the Chocolate: In a microwave-safe bowl, combine the chocolate chips and coconut oil (if using). Microwave in 30-second intervals, stirring between each, until the chocolate is fully melted and smooth.
- Prepare the Muffin Tin: Line a muffin tin with paper liners or silicone cups to prevent sticking and make removal easy.
- Add Chocolate to Liners: Spoon a small amount of melted chocolate into the bottom of each liner, spreading it slightly up the sides to form a shell.
- Chill: Place the muffin tin in the refrigerator for 10-15 minutes to allow the chocolate base to set firmly.
- Mix Filling Ingredients: In a medium bowl, thoroughly combine peanut butter, powdered sugar, graham cracker crumbs, vanilla extract, and salt until smooth.
- Add Peanut Butter Filling: Remove the muffin tin from the fridge and fill each chocolate-lined cup about 3/4 full with the peanut butter mixture.
- Add Jelly Layer: Top each peanut butter filling with a small spoonful of jelly or jam, creating a slight well in the center for a perfect swirl.
- Top with Chocolate: Pour the remaining melted chocolate over the jelly layer, ensuring the cups are fully covered. Gently tap the muffin tin on the counter to settle the chocolate evenly.
- Chill Again: Refrigerate the filled cups for another 15-20 minutes until the top chocolate layer is completely set and firm.
- Remove from Tin: Once fully set, carefully peel off the liners and remove the cups from the muffin tin.
- Enjoy: Serve these delightful peanut butter and jelly cups immediately or store them in an airtight container in the refrigerator for up to one week.
Notes
- Use natural peanut butter for a healthier option, but regular creamy peanut butter works well too.
- The coconut oil in the chocolate shell is optional but helps give a smoother, shinier finish to the chocolate.
- Feel free to use your favorite jelly or jam flavor to customize the taste.
- If you prefer a crunchier texture, add extra graham cracker crumbs to the peanut butter filling.
- Store these cups refrigerated to keep the chocolate firm and fresh.
- For an extra touch, sprinkle crushed peanuts or chopped nuts on top before the final chilling step.