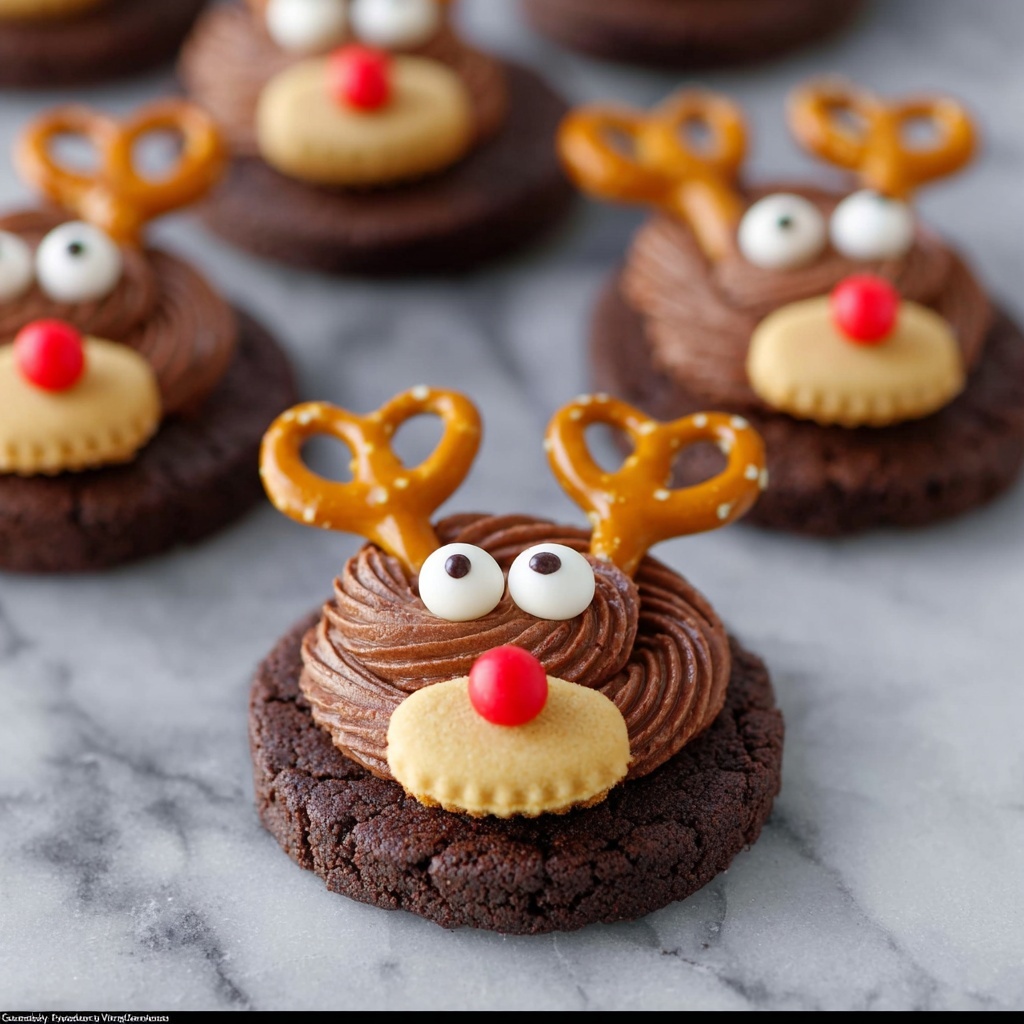
If you are looking for a festive and fun treat that brings holiday cheer to your kitchen, you will absolutely adore this Rudolph Cookies Recipe. These delightful cookies combine rich, fudgy chocolate with playful reindeer decorations that are as charming to look at as they are delicious to eat. Whether you are baking for a holiday party, family gathering, or simply to spread some seasonal joy, this recipe is a guaranteed crowd-pleaser. It is a perfect blend of moist cake-mix cookie base, creamy chocolate frosting, and those iconic Rudolph touches that make every bite magical.
Ingredients You’ll Need
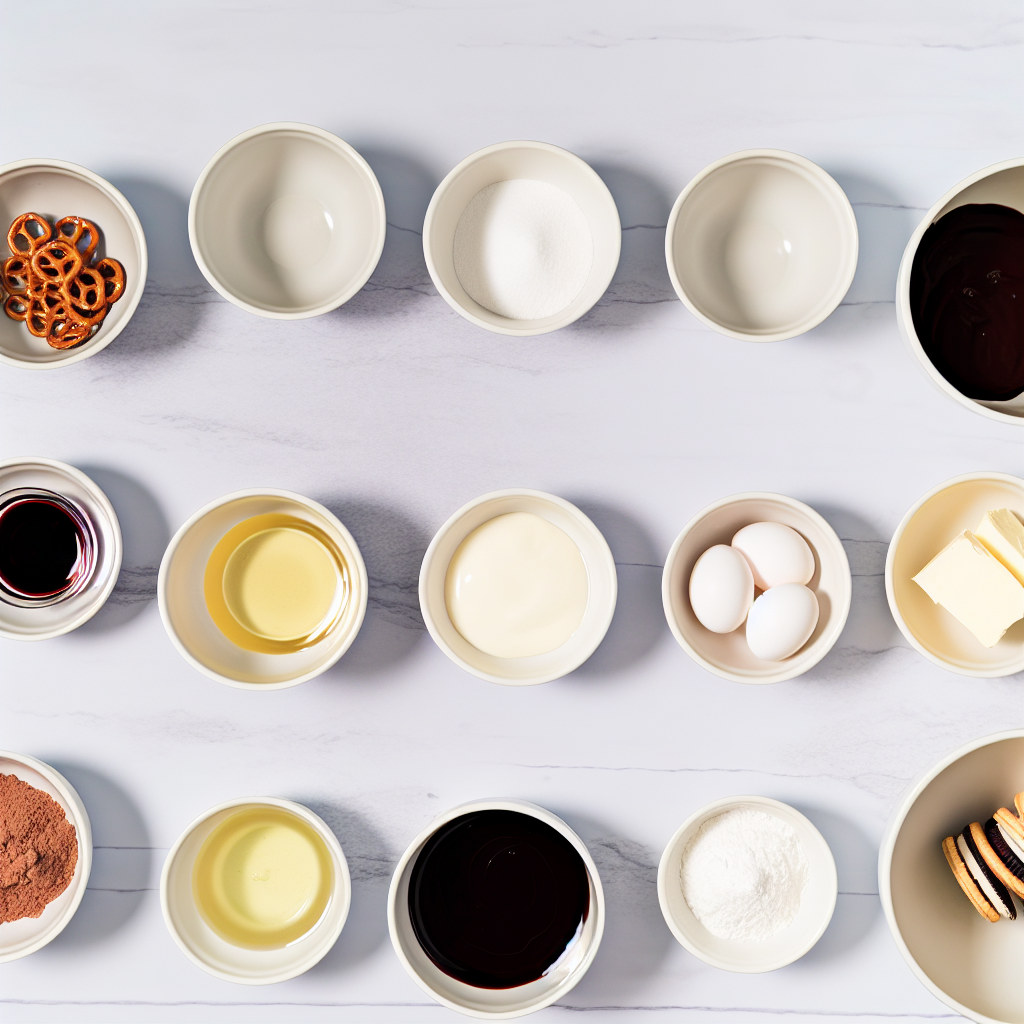
This Rudolph Cookies Recipe calls for simple ingredients that you probably already have in your pantry or can easily find at your local store. Each ingredient is chosen to give these cookies their rich chocolate flavor, tender texture, and festive flair.
- Devil’s Food Cake Mix: The base of the cookie, providing that moist, chocolatey foundation that makes these cookies irresistible.
- Eggs: Help bind the ingredients together and give structure to the cookies.
- Oil: Keeps the cookies moist and soft without weighing down the batter.
- Butter (softened): Adds richness and smoothness to the frosting.
- Unsweetened Cocoa Powder: Intensifies the chocolate flavor in the frosting.
- Vanilla Extract: Enhances the overall taste with a warm, comforting note.
- Milk: Adjusts the frosting consistency for easy spreading.
- Powdered Sugar: Sweetens and thickens the frosting perfectly.
- Nilla Wafers: Serve as the face base for the reindeer decorations.
- Melted Chocolate: Used for creating the eyes of the reindeer.
- Mini Pretzels: Perfect for antlers, adding a fun crunch and rustic look.
- Red M&M’s: The star of the show, Rudolph’s bright red nose.
How to Make Rudolph Cookies Recipe
Step 1: Preheat and Prepare
First things first, heat your oven to 350 degrees and line your baking sheets with parchment paper. This simple step ensures your cookies will bake evenly and won’t stick, making clean-up a breeze and results flawless.
Step 2: Mix the Cookie Batter
In a medium mixing bowl, combine the Devil’s Food Cake Mix, eggs, and oil until a thick batter forms. If the batter feels too dense, don’t hesitate to add just a little more oil to keep the cookies tender and moist during baking.
Step 3: Form and Shape Cookies
Shape the dough into balls slightly smaller than a golf ball and place them onto the prepared pans. Press each ball down gently to avoid the cookies puffing up too tall, which helps them bake with a perfect, flatter surface for frosting later.
Step 4: Bake to Perfection
Bake the cookies for 7 to 9 minutes. If you prefer a fudgier cookie, aim for the shorter bake time. These cookies should come out soft and slightly underbaked for that rich, melt-in-your-mouth texture.
Step 5: Cool Completely
Once baked, transfer the cookies to wire racks and let them cool fully. This cooling step is important for the frosting to adhere properly without melting off.
Step 6: Make the Chocolate Frosting
Beat the softened butter until smooth. Gradually add in the cocoa powder, vanilla extract, and milk, followed by the powdered sugar. Mix until you reach a fluffy, spreadable consistency. You can adjust the amount of milk to get the perfect thickness—just right for decorating without running.
Step 7: Create Reindeer Eyes
Melt your chocolate and use a toothpick to dot small blobs onto the white M&M’s to craft the eyes. This little detail adds the perfect look of lively, adorable reindeer eyes to bring your cookies to life.
Step 8: Assemble Your Rudolph Cookies
Frost each cookie generously, then place a Nilla wafer on top for the face base. Add pretzels for antlers, and use a dab of frosting to stick on the red M&M as Rudolph’s nose along with the eye M&M’s. For variety, feel free to use brown M&M’s or Reese’s Pieces to create other reindeer family members.
How to Serve Rudolph Cookies Recipe
Garnishes
These cookies already come decorated as adorable reindeer, but if you want to add a little extra sparkle, dust a pinch of edible glitter or powdered sugar snow on top. You can also place a tiny dab of white frosting on the pretzel antlers for a “frosted” look that really captures the winter magic.
Side Dishes
Serve your Rudolph Cookies alongside a cozy mug of hot cocoa or warm spiced apple cider. The chocolate-rich cookies pair wonderfully with creamy, warm drinks, making for a truly comforting holiday experience.
Creative Ways to Present
Arrange the cookies on a festive platter lined with evergreen sprigs or red berries for a stunning centerpiece. Wrapping cookies individually in clear cellophane bags with red ribbons makes a perfect homemade gift that anyone will appreciate during the holidays.
Make Ahead and Storage
Storing Leftovers
Leftover Rudolph Cookies will keep beautifully stored in an airtight container at room temperature for up to 5 days. This ensures they stay soft and delicious without drying out, so you can enjoy them throughout the holiday season.
Freezing
If you want to make these cookies ahead of time, you can freeze them after baking and cooling. Place the cookies in a single layer on a baking sheet to flash freeze, then transfer them to a freezer-safe container or bag. They’ll keep for up to 3 months and thaw quickly when you’re ready.
Reheating
For a freshly baked taste, warm your cookies in the microwave for 10 to 15 seconds. This softens the frosting and brings out the gooey chocolate texture, making you feel like you just took them out of the oven.
FAQs
Can I use a different cake mix for this Rudolph Cookies Recipe?
While Devil’s Food Cake Mix gives the richest chocolate flavor, you can experiment with other chocolate cake mixes. Just expect slight changes in flavor or texture, and keep an eye on the baking time as it may vary slightly.
What if I don’t have Nilla Wafers for the cookie faces?
Graham cracker rounds or any small, flat cookies can be a great substitute. The key is to choose something sturdy enough to hold the frosting and candy decorations without breaking.
How do I make sure the pretzel antlers don’t fall off?
Use a generous dot of frosting as “glue” to attach the pretzels and press them firmly onto the cookies while the frosting is still soft. Let the cookies set for a few minutes to ensure everything sticks well.
Can I make these cookies gluten-free?
Unfortunately, this recipe relies heavily on traditional cake mix and Nilla Wafers, which contain gluten. However, you can look for gluten-free chocolate cake mixes and gluten-free cookies to create a similar effect.
What’s the best way to transport these cookies?
Place them in a single layer in an airtight container with parchment paper between layers to avoid sticking and damage to the decorations. Be gentle when stacking and try to keep them cool to maintain the frosting’s integrity.
Final Thoughts
This Rudolph Cookies Recipe is such a joyful and delightful way to celebrate the holidays with loved ones. Baking and decorating these festive treats is almost as fun as eating them! Whether you’re a seasoned baker or a newbie, this recipe brings warmth, laughter, and deliciousness right to your kitchen. So grab your ingredients and start your own Rudolph cookie tradition today—you won’t regret it!
Print
Rudolph Cookies Recipe
- Prep Time: 15 minutes
- Cook Time: 9 minutes
- Total Time: 24 minutes
- Yield: 30 cookies
- Category: Dessert
- Method: Baking
- Cuisine: American
Description
Delight in festive Rudolph Cookies, a charming holiday treat made from a rich Devil’s Food Cake Mix base, topped with creamy cocoa frosting, and decorated with a playful reindeer face using Nilla wafers, pretzels, and colorful M&Ms. These cookies are quick to bake, visually fun, and perfect for holiday celebrations with family and friends.
Ingredients
Cookie Dough
- 1 box Devil’s Food Cake Mix
- 2 eggs
- 1/3 cup oil (plus more if needed)
- 3/4 cup butter (softened)
- 1/4 cup unsweetened cocoa powder
- 1 teaspoon vanilla extract
- 2 tablespoons milk (plus more if needed)
- 2 cups powdered sugar (plus more as needed)
Decorations
- Nilla Wafers
- 1/4 cup melted chocolate
- Mini pretzels
- Red M&Ms (for Rudolph’s nose)
- White M&Ms (for eyes)
- Brown M&Ms or Reese’s Pieces (optional for other reindeer)
Instructions
- Preheat Oven: Preheat your oven to 350°F (175°C) and line baking pans with parchment paper to prevent sticking and ensure easy cleanup.
- Prepare Cookie Dough: In a medium bowl, combine the Devil’s Food Cake Mix, eggs, and oil. Stir well until the batter is thick and uniform. If the dough feels too stiff, add a small amount of oil to loosen it.
- Form and Shape Cookies: Roll the dough into balls slightly smaller than a golf ball. Place them spaced apart on the prepared pans and gently press down the dough balls so they don’t bake too tall, ensuring a flat top for decoration.
- Bake Cookies: Bake the cookies in the preheated oven for 7 to 9 minutes, adjusting time based on your preferred fudgey texture. Remove from oven once done.
- Cool Cookies: Transfer the baked cookies to wire racks and allow them to cool completely before decorating to avoid melting the frosting and decorations.
- Make Cocoa Frosting: Beat the softened butter until smooth. Add cocoa powder, vanilla extract, and milk, mixing well. Gradually blend in powdered sugar until you achieve the desired frosting consistency. Add more milk to thin the frosting if needed.
- Create Reindeer Eyes: Melt the chocolate (using melts or any chocolate you have). Using a toothpick tip, carefully place tiny dots of melted chocolate onto white M&Ms to form pupils. Adjust size according to preference.
- Assemble Rudolph Cookies: Spread frosting over each cooled cookie. Place a Nilla wafer on top to represent the reindeer’s face, position two mini pretzels for antlers, and then attach the red M&M for Rudolph’s nose using a dab of frosting. Stick on the decorated white M&M eyes with frosting as well. For other reindeer variations, substitute red M&Ms with brown ones or Reese’s Pieces.
Notes
- Ensure cookies are completely cool before frosting to prevent melting.
- You can adjust the cookie bake time for a chewier or cakier texture.
- If the cookie dough is too sticky, refrigerate for 15 minutes before shaping.
- Use parchment paper for easy cleanup and to avoid cookie sticking.
- Substitute milk with a milk alternative to make frosting dairy-free.
- Melted chocolate can be replaced by chocolate chips melted gently in the microwave.
- For a gluten-free option, use a gluten-free cake mix and gluten-free Nilla wafers.


