
If you’re looking for a vibrant, healthy, and irresistibly tasty side dish, you’re going to adore this Air Fryer Butternut Squash: 7 Reasons You’ll Love It Recipe. Roasting butternut squash to perfection in the air fryer creates a caramelized, tender texture that feels like a little fall comfort in every bite. It’s quick, simple, and absolutely bursting with flavor, making it a new favorite way to enjoy this naturally sweet and buttery vegetable any time of year.
Ingredients You’ll Need
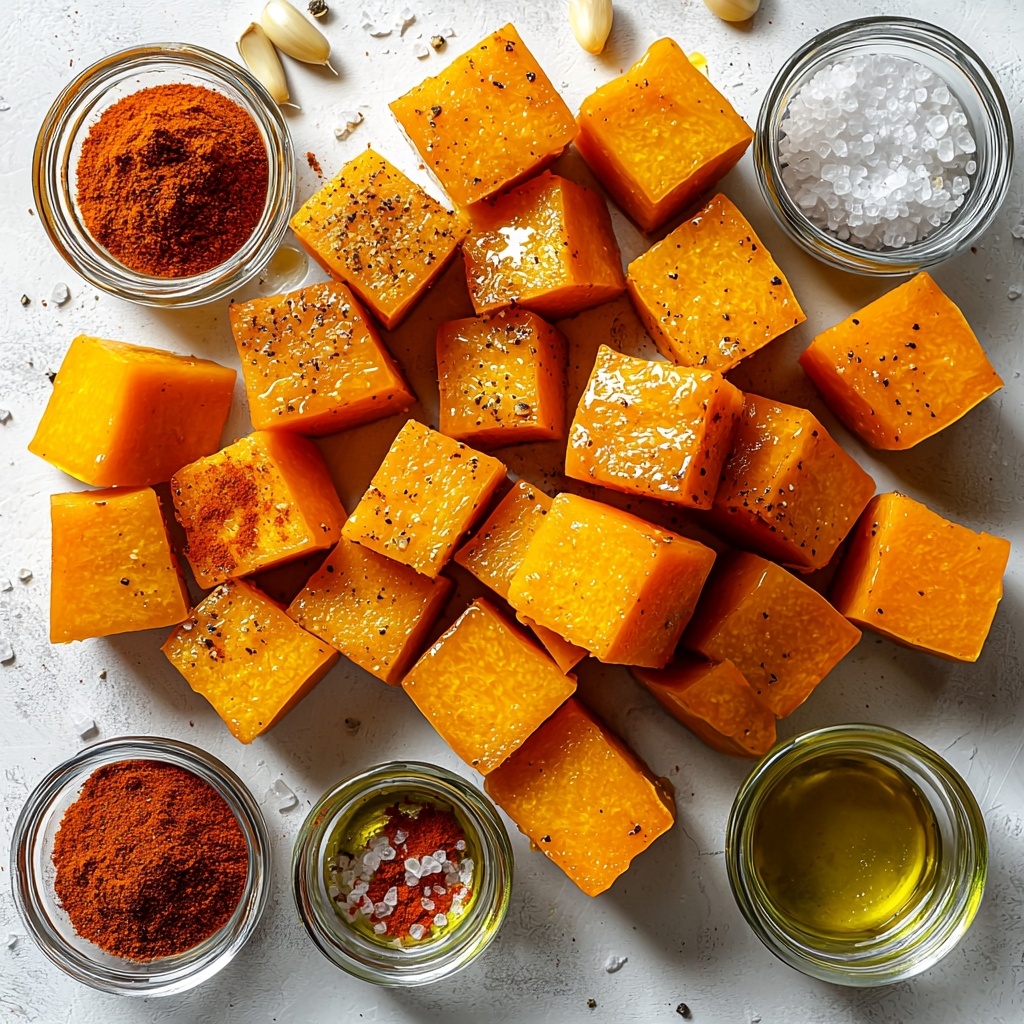
Just a handful of simple ingredients come together to transform the humble butternut squash into a crowd-pleaser. Each one adds something special—olive oil for crispness, garlic and paprika for a smoky depth, and just the right amount of seasoning to bring out the squash’s natural sweetness.
- 1 medium butternut squash, peeled and cubed: The star of the dish, providing creamy sweetness and hearty texture.
- 2 tablespoons olive oil: Helps achieve that perfect golden crisp on the outside without drying it out.
- 1 teaspoon salt: Enhances all the natural flavors of the squash and spices.
- 1/2 teaspoon black pepper: Adds a subtle kick and balances the sweetness.
- 1 teaspoon garlic powder: Brings a warm, savory aroma that complements the sweet squash beautifully.
- 1 teaspoon paprika: Offers a smoky undertone and vibrant color that makes the dish pop.
How to Make Air Fryer Butternut Squash: 7 Reasons You’ll Love It Recipe
Step 1: Preheat Your Air Fryer
Start by setting your air fryer to 400°F (200°C). Preheating is a crucial step for ensuring your butternut squash roasts evenly and crisps up beautifully on the outside while staying tender inside.
Step 2: Season the Butternut Squash
In a large bowl, combine the peeled and cubed butternut squash with the olive oil, salt, black pepper, garlic powder, and paprika. This simple blend gives each bite a perfect balance of savory and smoky notes, locking in moisture and flavor.
Step 3: Toss Until Evenly Coated
Give everything a good mix until every piece of squash is generously coated with the seasoning and olive oil. This step ensures each bite delivers that perfect crispy exterior and melting inside.
Step 4: Arrange in the Air Fryer Basket
Place the seasoned squash in a single layer in your air fryer basket. Spreading out the pieces is key to getting that signature crispy texture instead of steaming.
Step 5: Cook and Shake
Cook the squash for 15-20 minutes, shaking the basket halfway through. This toss redistributes the pieces to brown evenly and prevents any from sticking or burning.
Step 6: Check for Tenderness
After about 15 minutes, test the squash with a fork—it should be tender but still hold its shape. If needed, cook a few minutes longer to get that perfect bite.
Step 7: Serve Warm and Enjoy
Remove the squash from the air fryer and serve it warm. The vibrant color and amazing aroma make this dish as inviting on the table as it is delicious to eat.
How to Serve Air Fryer Butternut Squash: 7 Reasons You’ll Love It Recipe
Garnishes
Sprinkle some freshly chopped parsley or cilantro over the roasted butternut squash to add a pop of freshness and color, brightening the dish and giving it a hint of herbal lift that perfectly complements the smoky spice blend.
Side Dishes
This Air Fryer Butternut Squash pairs beautifully with roasted chicken, grilled steak, or even a hearty quinoa salad. The sweet and savory profile makes it the ideal sidekick, adding warmth and balance to bigger meals.
Creative Ways to Present
For a fun twist, toss the cooked squash into warm tortillas with black beans and avocado for quick tacos, or sprinkle it on top of mixed greens with some goat cheese for a seasonal salad that impresses every time.
Make Ahead and Storage
Storing Leftovers
If you have leftovers, store the roasted butternut squash in an airtight container in the refrigerator for 3-4 days. It keeps its flavor and texture well, making it easy to enjoy again as a quick snack or addition to your meals.
Freezing
You can freeze the cooked squash by laying it out on a baking sheet to flash freeze, then transferring it to a freezer-safe bag or container. Frozen butternut squash can be stored for up to 3 months, convenient for busy days when you want something nutritious ready to go.
Reheating
To reheat, either pop the squash back in the air fryer at 350°F for 5-7 minutes or warm it gently in the oven to bring back that delightful crispness. Microwave reheating works too but might reduce the crunch.
FAQs
Can I use frozen butternut squash for this recipe?
Yes! Just be sure to thaw and pat it dry before seasoning so it roasts properly and doesn’t steam in the air fryer.
What if I don’t have paprika?
No worries! You can substitute smoked paprika for a deeper smoky flavor or a pinch of chili powder for a little heat.
How do I know when the butternut squash is done?
It’s ready when it’s fork-tender and golden brown on the edges. The cook time can vary slightly depending on your air fryer model.
Is this recipe suitable for meal prep?
Absolutely! It’s perfect for making ahead because you can store and reheat it easily while retaining great flavor and texture.
Can I add other vegetables with the butternut squash?
You can try adding carrots or sweet potatoes, but keep in mind that different vegetables may require slight adjustments in cooking time.
Final Thoughts
This Air Fryer Butternut Squash: 7 Reasons You’ll Love It Recipe is genuinely one of those dishes that brings joy to both making and eating. It’s quick, fuss-free, and packed with flavor, making it a fantastic way to add some cozy warmth and color to your meals. Give it a try—you might just find yourself craving it again and again!
Print
Air Fryer Butternut Squash: 7 Reasons You’ll Love It Recipe
- Prep Time: 10 minutes
- Cook Time: 15-20 minutes
- Total Time: 25-30 minutes
- Yield: 4 servings
- Category: Side Dish
- Method: Air Frying
- Cuisine: American
- Diet: Vegetarian
Description
This simple and delicious Air Fryer Butternut Squash recipe transforms the naturally sweet and nutty squash into a perfectly tender, slightly crispy side dish with minimal effort. Ideal for busy cooks, it uses basic pantry seasonings and cooks quickly in the air fryer to lock in flavor and texture.
Ingredients
Ingredients
- 1 medium butternut squash, peeled and cubed (about 4 cups)
- 2 tablespoons olive oil
- 1 teaspoon salt
- 1/2 teaspoon black pepper
- 1 teaspoon garlic powder
- 1 teaspoon paprika
Instructions
- Preheat Air Fryer: Preheat your air fryer to 400°F (200°C) to ensure it reaches the optimal cooking temperature for roasting the squash evenly.
- Season the Squash: In a large bowl, combine the peeled and cubed butternut squash with olive oil, salt, black pepper, garlic powder, and paprika. Toss everything until the squash is evenly coated with the seasoning mixture.
- Arrange in Basket: Place the seasoned squash in a single layer inside the air fryer basket. Avoid overcrowding to ensure proper air circulation and even cooking.
- Cook: Air fry the squash for 15-20 minutes, shaking the basket halfway through the cooking time. This helps the pieces cook evenly and develop a slight crisp on the edges.
- Check Doneness: After cooking, check the squash for tenderness by piercing a piece with a fork. If it’s not tender enough, continue cooking in 2-3 minute increments until desired softness is reached.
- Serve: Remove the cooked butternut squash from the air fryer and serve warm as a tasty side dish or addition to salads and bowls.
Notes
- You can adjust seasoning to taste by adding herbs like thyme or rosemary for more flavor.
- If your air fryer basket is small, cook the squash in batches to avoid overcrowding and ensure even cooking.
- Leftovers can be stored in an airtight container in the refrigerator for up to 3 days and reheated in the air fryer for best texture.
- Use fresh butternut squash for best results; frozen squash may release too much water and become soggy.


