
“`html
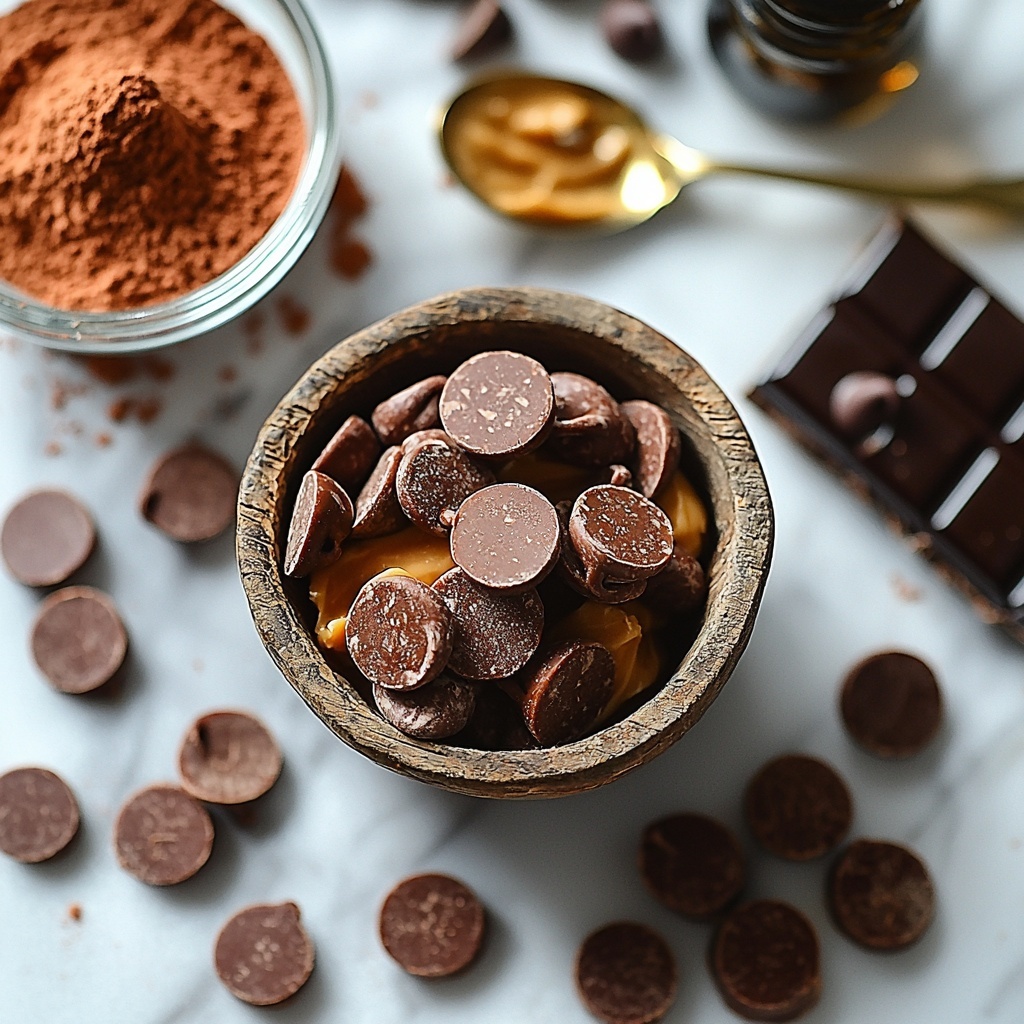
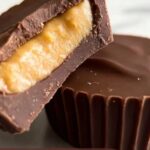
If you are dreaming of a holiday treat that blends the perfect harmony of creamy peanut butter and luscious chocolate, then I have something incredibly special for you. The Christmas Chocolate Peanut Butter Cups: 5 Sweet Delights Recipe is an absolute showstopper—easy to make, wonderfully rich, and irresistibly festive. These little cups capture the spirit of the season in every bite, offering the smooth sweetness of milk chocolate mixed with a hint of cocoa and the rich, nutty creaminess of peanut butter. Once you try this recipe, it might just become your go-to holiday indulgence for sharing and savoring with loved ones.
Ingredients You’ll Need
Each ingredient in this recipe is straightforward yet plays a crucial role in creating that perfect balance of flavor and texture. From the silky peanut butter to the velvety milk chocolate chips, every element is essential to crafting these delightful treats.
- 1 cup creamy peanut butter: This provides the smooth, nutty foundation that melts in your mouth and pairs flawlessly with chocolate.
- 1/2 cup powdered sugar: Adds just the right sweetness and helps to thicken the peanut butter layer for a perfect consistency.
- 1 cup milk chocolate chips: Melts into a glossy, sweet chocolate base and topping that encases the peanut butter filling.
- 1/4 cup unsweetened cocoa powder: Brings a rich, deep chocolate flavor that balances the sweetness and adds a touch of sophistication.
- 1/2 teaspoon vanilla extract: Elevates the overall flavor with warm, aromatic notes that tie everything together beautifully.
How to Make Christmas Chocolate Peanut Butter Cups: 5 Sweet Delights Recipe
Step 1: Prepare the Peanut Butter Mixture
Start by stirring together the creamy peanut butter and powdered sugar in a bowl until you achieve a smooth, even mixture. This step ensures your peanut butter layers have the perfect texture—creamy yet firm enough to hold shape inside each cup.
Step 2: Melt the Chocolate Chips
Gently melt the milk chocolate chips using a microwave or a double boiler method for a smooth, glossy finish. Be patient here—melting slowly prevents burning and keeps the chocolate silky.
Step 3: Enhance the Chocolate
To your melted chocolate, add the unsweetened cocoa powder and vanilla extract, stirring thoroughly until the cocoa is fully incorporated and the mixture is velvety. This combination creates a rich chocolate base and topping with depth of flavor.
Step 4: Prepare the Muffin Tin
Line a muffin tin with cupcake liners to make assembling the cups a breeze and ensure easy removal later on. Each liner will cradle the layers of chocolate and peanut butter perfectly.
Step 5: Layer the Chocolate
Pour a thin layer of the chocolate mixture into the bottom of each cupcake liner. This base will serve as the delicious foundation for your peanut butter center.
Step 6: Add the Peanut Butter Filling
Spoon a dollop of the peanut butter mixture onto the chocolate layer in each cup. Be mindful to keep the peanut butter layer centered and even for balanced bites.
Step 7: Cover with More Chocolate
Carefully spoon the remaining chocolate mixture over the peanut butter to seal the cups with a delectable chocolate shell. Smooth the top gently with the back of a spoon for an attractive finish.
Step 8: Chill Thoroughly
Place the assembled cups in the refrigerator to chill and set for at least 2 hours. This step is key to achieving that firm yet tender texture that melts perfectly on your tongue.
Step 9: Serve and Enjoy
Once set, remove the peanut butter cups from their liners and prepare to delight in every rich, creamy bite. These little gems are ready to brighten any holiday celebration!
How to Serve Christmas Chocolate Peanut Butter Cups: 5 Sweet Delights Recipe
Garnishes
Add a festive touch by sprinkling crushed candy canes, chopped toasted peanuts, or a light dusting of cocoa powder atop your peanut butter cups before serving. These small details not only look stunning but add an extra layer of flavor and texture.
Side Dishes
Pair these decadent cups with a warm cup of spiced hot cocoa or freshly brewed coffee to create a cozy holiday dessert experience. They also compliment a cheeseboard or fruit platter wonderfully, providing a sweet contrast to savory or fresh bites.
Creative Ways to Present
Elevate your presentation by arranging these peanut butter cups in decorative holiday boxes or glass jars tied with ribbon—perfect for gifting or making your dessert table sparkle. You can also place them on festive cupcake stands or trays lined with holiday-themed napkins for an inviting display.
Make Ahead and Storage
Storing Leftovers
If you have any of these delicious Christmas Chocolate Peanut Butter Cups left over, store them in an airtight container in the refrigerator. They will stay fresh and maintain their texture and flavor beautifully for 3-4 days.
Freezing
To keep these treats longer, place them in a sealed freezer-safe container separated by parchment paper and freeze for up to 1 month. Thaw in the refrigerator overnight before serving to preserve their creamy and chocolatey goodness.
Reheating
Reheating is not necessary for this recipe, as these cups are best enjoyed chilled or at room temperature. Simply allow them to sit out a few minutes if they are too firm from the fridge, and they’ll soften just enough for the perfect bite.
FAQs
Can I use crunchy peanut butter instead of creamy?
Definitely! Using crunchy peanut butter will add a lovely texture contrast, giving your peanut butter cups a bit of a nutty crunch that some people love.
What if I want to make these dairy-free?
You can substitute the milk chocolate chips with your favorite dairy-free or vegan chocolate chips to make a dairy-free version that’s just as rich and tasty.
How do I prevent the chocolate layers from mixing with the peanut butter filling?
Make sure to chill the first chocolate layer briefly before adding the peanut butter filling; this helps create a solid base that prevents the layers from blending together.
Can these be made gluten-free?
Yes, these peanut butter cups are naturally gluten-free as long as you check that your chocolate chips and other ingredients are certified gluten-free.
Is powdered sugar necessary, or can I use granulated sugar?
Powdered sugar is preferred here because it dissolves easily into the peanut butter, creating a smooth texture. Granulated sugar might leave a grainy feel and is not recommended for this recipe.
Final Thoughts
There is something truly magical about making and sharing the Christmas Chocolate Peanut Butter Cups: 5 Sweet Delights Recipe. It’s a simple, joyful creation that embodies the cozy spirit of the holidays with every bite. Whether you’re gifting them or indulging alongside your favorite people, these peanut butter cups bring warmth, sweetness, and a bit of festive sparkle to your season. I encourage you to dive into this recipe and watch it become a cherished holiday tradition in your kitchen.
“`
Print
Christmas Chocolate Peanut Butter Cups: 5 Sweet Delights Recipe
- Prep Time: 15 minutes
- Cook Time: 0 minutes
- Total Time: 2 hours 15 minutes
- Yield: 12 servings
- Category: Dessert
- Method: No-Cook
- Cuisine: American
Description
These Christmas Chocolate Peanut Butter Cups are a festive and indulgent treat featuring creamy peanut butter layered between rich milk chocolate infused with cocoa and vanilla. Perfect for holiday gatherings, these no-bake delights combine sweet and salty flavors in a delightful mini cup form. With only a few simple ingredients and easy steps, they make a perfect homemade gift or dessert to enjoy during the festive season.
Ingredients
Peanut Butter Mixture
- 1 cup creamy peanut butter
- 1/2 cup powdered sugar
Chocolate Mixture
- 1 cup milk chocolate chips
- 1/4 cup unsweetened cocoa powder
- 1/2 teaspoon vanilla extract
Instructions
- Prepare Peanut Butter Mixture: In a medium bowl, combine the creamy peanut butter and powdered sugar. Stir thoroughly until the mixture is smooth and well combined, forming a thick, creamy filling.
- Melt Chocolate Chips: Using a microwave-safe bowl or a double boiler, gently melt the milk chocolate chips until smooth. Be careful to stir frequently to avoid burning the chocolate.
- Add Cocoa and Vanilla: To the melted chocolate, add the unsweetened cocoa powder and vanilla extract. Mix well until the chocolate is evenly flavored and smooth in consistency.
- Prepare Muffin Tin: Line a standard muffin tin with cupcake liners to hold the peanut butter cups securely and make for easy removal after chilling.
- First Chocolate Layer: Pour a small layer of the chocolate mixture into each cupcake liner, spreading it to cover the bottom.
- Add Peanut Butter Layer: Spoon a portion of the peanut butter mixture on top of the chocolate layer in each liner, gently pressing it down to create an even layer.
- Top with Chocolate: Cover the peanut butter layer with another layer of the remaining chocolate mixture, ensuring the peanut butter is fully enclosed.
- Chill: Place the muffin tin in the refrigerator and chill the peanut butter cups for at least 2 hours, or until fully set and firm.
- Serve: Once chilled, remove the cups from the refrigerator, peel away the cupcake liners, and serve immediately or store in a cool place until ready to enjoy.
Notes
- Use creamy peanut butter for smooth texture; natural peanut butter may alter consistency.
- Ensure the chocolate is melted gently to prevent burning or seizing.
- For a richer flavor, use high-quality milk chocolate chips.
- Can be stored in an airtight container in the refrigerator for up to 1 week.
- For variation, add a pinch of sea salt on top before chilling for a salted chocolate peanut butter cup.